RecyclerView as Staggered Grid in Android With Example
Last Updated : 16 Aug, 2024
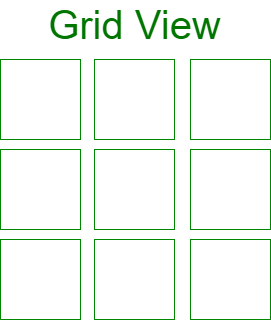
GridView: A ViewGroup that shows the items in a two-dimensional scrolling grid. In Grid View, each grid is of the same size. i.e., the height and width of each grid are equal. It shows symmetric items in the views.
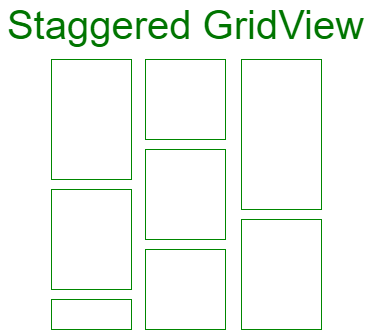
Staggered GridView: This ViewGroup is the extension of Grid View. In this view, the Grid is of varying size .i.e., their height and width may vary. It shows asymmetric items in the views. It automatically sets the item views according to its height and width.
In order to use RecyclerView for creating staggering grid views, we need to use StaggeredGridLayoutManager. LayoutManager is responsible for measuring and positioning item views in the RecyclerView and also recycle the item views when they are no longer visible to the user. There are three types of built-in layout managers.
- LinearLayoutManager: It is used to show item views in a vertical and horizontal list.
- GridLayoutManager: It is used to show item views grid views.
- StaggeredLayoutManager: It is used to show item views in staggered views.
We can also create a custom layout manager by RecyclerView.LayoutManager class.
StaggeredGridLayoutManager(int spanCount, int orientation)
- Creates staggered grid layout with given parameters
- The first parameter, spanCount is used to set the number of columns in a vertical orientation or the number of rows in the horizontal orientation
- The second parameter, orientation is used to set the vertical or horizontal orientation
Staggered Grid with Vertical Orientation
RecyclerView recyclerView = (RecyclerView)findViewById(R.id.recyclerView);
// staggeredGridLayoutManager with 3 columns and vertical orientation
StaggeredGridLayoutManager staggeredGridLayoutManager = new StaggeredGridLayoutManager(3, LinearLayoutManager.VERTICAL);
// setting recycler view layout to staggered grid
recyclerView.setLayoutManager(staggeredGridLayoutManager);
Staggered Grid with Horizontal Orientation
RecyclerView recyclerView = (RecyclerView)findViewById(R.id.recyclerView);
// staggeredGridLayoutManager with 3 rows and horizontal orientation
StaggeredGridLayoutManager staggeredGridLayoutManager = new StaggeredGridLayoutManager(3, LinearLayoutManager.HORIZONTAL);
// setting recycler view layout to staggered grid
recyclerView.setLayoutManager(staggeredGridLayoutManager);
Example
In this example, we would store data into ArrayList which is used for populating RecyclerView. After that we set the layout manager of RecyclerView as a staggered grid view and then, we set the Adapter for RecyclerView to show item views. A sample GIF is given below to get an idea about what we are going to do in this article.
Note that we are going to implement this project using the Java language.
Step by Step Implementation
Step 1: Create a New Project
To create a new project in Android Studio please refer to How to Create/Start a New Project in Android Studio. Note that select Java as the programming language.
Step 2: Adding dependencies
We are going to use the RecyclerView. So, we need to add the dependency of it. For adding the dependency Go to Gradle Scripts > build.gradle(Module: app) and add the following dependencies. After adding these dependencies you need to click on Sync Now.
dependencies {
implementation 'androidx.recyclerview:recyclerview:1.1.0'
}
Before moving further let’s add some color attributes in order to enhance the app bar. Go to app > res > values > colors.xml and add the following color attributes.
XML <resources> <color name="colorPrimary">#0F9D58</color> <color name="colorPrimaryDark">#16E37F</color> <color name="colorAccent">#03DAC5</color> </resources>
Step 3: Working with the activity_main.xml file
In this step, we will create a RecyclerView layout in the activity_main.xml file. Go to app > res > layout > activity_main.xml and add the following code snippet.
XML <?xml version="1.0" encoding="utf-8"?> <RelativeLayout xmlns:android="http://schemas.android.com/apk/res/android" xmlns:tools="http://schemas.android.com/tools" android:layout_width="match_parent" android:layout_height="match_parent" tools:context=".MainActivity"> <androidx.recyclerview.widget.RecyclerView android:id="@+id/recyclerView" android:layout_width="match_parent" android:layout_height="match_parent" /> </RelativeLayout>
Step 4: Create a new layout file list_item.xml for the list items of RecyclerView
Go to the app > res > layout > right-click > New > Layout Resource File and name it as list_item. list_item.xml layout file contains an ImageView which is used for populating the rows of RecyclerView.
XML <?xml version="1.0" encoding="utf-8"?> <RelativeLayout xmlns:android="http://schemas.android.com/apk/res/android" android:layout_width="wrap_content" android:layout_height="wrap_content" android:layout_margin="4dp"> <!--For image src we have used ic_launcher it is used only for reference how it will look"--> <ImageView android:id="@+id/imageView" android:layout_width="match_parent" android:layout_height="match_parent" android:scaleType="fitXY" android:src="@mipmap/ic_launcher" /> </RelativeLayout>
Step 5: Creating Adapter class for RecyclerView
Now, we will create an Adapter.java class that will extend the RecyclerView.Adapter with ViewHolder. Go to the app > java > package > right-click and create a new java class and name it as Adapter. In Adapter class we will override the onCreateViewHolder() method which will inflate the list_item.xml layout and pass it to View Holder. Then onBindViewHolder() method where we set data to the Views with the help of View Holder. Below is the code snippet for Adapter.java class.
Java import android.content.Context; import android.view.LayoutInflater; import android.view.View; import android.view.ViewGroup; import android.widget.ImageView; import androidx.annotation.NonNull; import androidx.recyclerview.widget.RecyclerView; import java.util.ArrayList; // Extends the Adapter class to RecyclerView.Adapter // and implement the unimplemented methods public class Adapter extends RecyclerView.Adapter<Adapter.ViewHolder> { ArrayList images; Context context; // Constructor for initialization public Adapter(Context context, ArrayList images) { this.context = context; this.images = images; } @NonNull @Override public Adapter.ViewHolder onCreateViewHolder(@NonNull ViewGroup parent, int viewType) { // Inflating the Layout(Instantiates list_item.xml layout file into View object) View view = LayoutInflater.from(parent.getContext()).inflate(R.layout.list_item, parent, false); // Passing view to ViewHolder Adapter.ViewHolder viewHolder = new Adapter.ViewHolder(view); return viewHolder; } // Binding data to the into specified position @Override public void onBindViewHolder(@NonNull Adapter.ViewHolder holder, int position) { // TypeCast Object to int type int res = (int) images.get(position); holder.images.setImageResource(res); } @Override public int getItemCount() { // Returns number of items currently available in Adapter return images.size(); } // Initializing the Views public class ViewHolder extends RecyclerView.ViewHolder { ImageView images; public ViewHolder(View view) { super(view); images = (ImageView) view.findViewById(R.id.imageView); } } }
Step 6: Working with the MainActivity.java file
In MainActivity.java class we create an ArrayList for storing images. These images are placed in the drawable folder(app > res > drawable). You can use any images in place of these. And then we get the reference RecyclerView and set the LayoutManager as StaggeredGridLayoutManager and Adapter, to show items in RecyclerView. Below is the code for the MainActivity.java file.
Java import android.os.Bundle; import androidx.appcompat.app.AppCompatActivity; import androidx.recyclerview.widget.LinearLayoutManager; import androidx.recyclerview.widget.RecyclerView; import androidx.recyclerview.widget.StaggeredGridLayoutManager; import java.util.ArrayList; import java.util.Arrays; public class MainActivity extends AppCompatActivity { RecyclerView recyclerView; // Using ArrayList to store images data ArrayList images = new ArrayList<>(Arrays.asList(R.drawable.img_1, R.drawable.img_2, R.drawable.img_3, R.drawable.img_4, R.drawable.img_5, R.drawable.img_6, R.drawable.img_7, R.drawable.img_8, R.drawable.img_9, R.drawable.img_10)); @Override protected void onCreate(Bundle savedInstanceState) { super.onCreate(savedInstanceState); setContentView(R.layout.activity_main); // Getting reference of recyclerView recyclerView = (RecyclerView) findViewById(R.id.recyclerView); // Setting the layout as Staggered Grid for vertical orientation StaggeredGridLayoutManager staggeredGridLayoutManager = new StaggeredGridLayoutManager(2, LinearLayoutManager.VERTICAL); recyclerView.setLayoutManager(staggeredGridLayoutManager); // Sending reference and data to Adapter Adapter adapter = new Adapter(MainActivity.this, images); // Setting Adapter to RecyclerView recyclerView.setAdapter(adapter); } } Output: Run on Emulator