Next.js is a React framework that enhances UI development with built-in features like server-side rendering and static site generation. It supports data fetching both on the server and client sides, enabling developers to load and manage data efficiently. By utilizing functions like fetch, Next.js allows for data fetching, enhancing the interactivity and responsiveness of web applications.
Fetch Function
The fetch function is a modern JavaScript API used to make HTTP requests. It returns a Promise that resolves to the Response object representing the response to the request. With fetch, you can perform GET, POST, and other HTTP operations, and process the response data using methods like .json() to handle JSON data. It is commonly used for client-side data fetching in web applications.
Syntax:
fetch(url, [options])
  .then(response => response.json()) // or response.text() for text responses
  .then(data => {
    // handling the data
  })
  .catch(error => {
    // handling any errors
  });
Steps to Create NextJS Application and using Fetch Function
Step 1: Create a Next.js application using the following command.
npx create-next-app@latest gfg
Step 2: It will ask you some questions, so choose the following.
√ Would you like to use TypeScript? ... No
√ Would you like to use ESLint? ... Yes
√ Would you like to use Tailwind CSS? ... No
√ Would you like to use `src/` directory? ... Yes
√ Would you like to use App Router? (recommended) ... Yes
√ Would you like to customize the default import alias (@/*)? ... Yes
Step 3: After creating your project folder i.e. gfg, move to it using the following command.
cd gfg
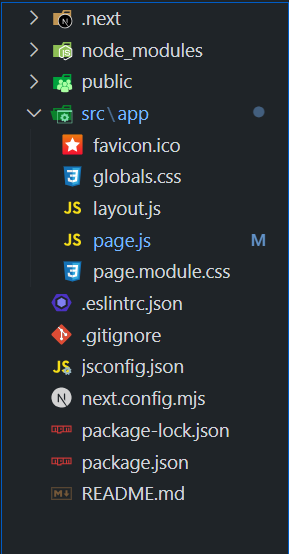
Folder Structure
Dependencies
"dependencies": {
    "react": "^18",
    "react-dom": "^18",
    "next": "14.2.5"
},
Example: This demonstrate Next.js client-side functionality to fetch data. The fetchData function retrieves a random post from an API each time the button is clicked. We manage the loading, error, and fetched data states to provide a responsive user experience.
JavaScript // src/app/page.js "use client"; import { useState } from 'react'; export default function HomePage() { const [data, setData] = useState(null); const [loading, setLoading] = useState(false); const [error, setError] = useState(null); const fetchData = async () => { setLoading(true); setError(null); try { const randomId = Math.floor(Math.random() * 100) + 1; const response = await fetch(` https://jsonplaceholder.typicode.com/posts/${randomId}`); if (!response.ok) { throw new Error(' Network response was not ok'); } const result = await response.json(); setData(result); } catch (error) { setError(error); } finally { setLoading(false); } }; return ( <main style={{ padding: '16px' }}> <h1 style={{ fontSize: '24px', fontWeight: 'bold', color: 'green' }}> GeeksforGeeks </h1> <h3 style={{ fontSize: '20px', marginTop: '16px' }}> NextJS: Fetch Function </h3> <button onClick={fetchData} style={{ padding: '10px 20px', fontSize: '16px', marginTop: '16px', backgroundColor: 'blue', color: 'white', border: 'none', borderRadius: '5px' }} > Fetch New Data </button> {loading && <p>Loading...</p>} {error && <p style={{ color: 'red' }}> Error: {error.message}</p>} {data && ( <div style={{ marginTop: '16px' }}> <h4>Fetched Data:</h4> <p><strong> Title:</strong> {data.title}</p> <p><strong> Body:</strong> {data.body}</p> </div> )} </main> ); } Output:
.gif)
Options in Fetch Option
Options.cache
Controls how the fetch request utilizes the browser cache. Possible values include 'default', 'no-store', 'reload', 'no-cache', 'force-cache', and 'only-if-cached'.
Syntax:
fetch(`https://...`, { cache: 'force-cache' | 'no-store' })Example: In this example we fetches data from a JSON placeholder API using the cache: 'force-cache' option, ensuring the response is always retrieved from the cache if available. The fetched data is then displayed.
JavaScript // src/app/page.js "use client"; import React, { useEffect, useState } from 'react'; const Page = () => { const [post, setPost] = useState(null); useEffect(() => { const fetchData = async () => { const response = await fetch( `https://jsonplaceholder.typicode.com/posts/1`, { cache: 'force-cache' }); const data = await response.json(); setPost(data); }; fetchData(); }, []); return ( <div> <h1 style={{ color: 'green' }}>GeeksforGeeks</h1> <h3 style={{ color: 'black' }}>Cache Option</h3> {post && ( <div> <h3 style={{ color: 'black' }}>Post Title</h3> <p>{post.title}</p> <h3 style={{ color: 'black' }}>Post Body</h3> <p>{post.body}</p> </div> )} </div> ); }; export default Page; Output:
 Output
Options.next.revalidate
Specifies the number of seconds after which the cached response should be revalidated. This ensures the content stays up-to-date based on the provided duration.
Syntax:
fetch(`https://...`, { next: { revalidate: false | 0 | number } })Example: The below example fetches data from a JSON placeholder API with a revalidate: 10 option, ensuring the response is revalidated every 10 seconds. It includes a button to manually refetch the data and displays the last fetched time to show the revalidation behavior.
JavaScript // src/app/page.js "use client"; import React, { useEffect, useState } from 'react'; const Page = () => { const [post, setPost] = useState(null); const [lastFetched, setLastFetched] = useState(null); const fetchData = async () => { const response = await fetch(` https://jsonplaceholder.typicode.com/posts/2`, { next: { revalidate: 10 // Revalidate after 10 seconds } }); const data = await response.json(); setPost(data); setLastFetched(new Date().toLocaleTimeString()); }; useEffect(() => { fetchData(); }, []); return ( <div> <h1 style={{ color: 'green' }}>GeeksforGeeks</h1> <h3 style={{ color: 'black' }}>Revalidate Option</h3> <button onClick={fetchData}>Refetch Post</button> {post && ( <div> <h3 style={{ color: 'black' }}>Post Title</h3> <p>{post.title}</p> <h3 style={{ color: 'black' }}>Post Body</h3> <p>{post.body}</p> <h3 style={{ color: 'black' }}>Last Fetched</h3> <p>{lastFetched}</p> </div> )} </div> ); }; export default Page; Output:
 Output
Options.next.tags
Allows tagging of the fetch request for easier cache invalidation and management. Tags can be used to group and invalidate multiple requests simultaneously.
Syntax:
fetch(`https://...`, { next: { tags: ['collection'] } })Example: The component fetches and displays a post from an API based on dynamic tags. Users can add or remove tags, triggering a re-fetch of the data each time the tags change. The component demonstrates the use of options.next.tags for easier cache invalidation and management.
JavaScript // src/app/page.js "use client"; import React, { useEffect, useState } from 'react'; const PageWithTags = () => { const [post, setPost] = useState(null); const [tags, setTags] = useState(['post', 'tagged-fetch']); const [newTag, setNewTag] = useState(''); const fetchData = async () => { const response = await fetch(' https://jsonplaceholder.typicode.com/posts/3', { next: { tags: tags, }, }); const data = await response.json(); setPost(data); }; useEffect(() => { fetchData(); }, [tags]); const handleAddTag = () => { if (newTag && !tags.includes(newTag)) { setTags([...tags, newTag]); setNewTag(''); } }; const handleRemoveTag = (tagToRemove) => { setTags(tags.filter(tag => tag !== tagToRemove)); }; return ( <div> <h1 style={{ color: 'green' }}>GeeksforGeeks</h1> <h3 style={{ color: 'black' }}>Tags Option</h3> <div> <input type="text" value={newTag} onChange={(e) => setNewTag(e.target.value)} placeholder="Add a new tag" /> <button onClick={handleAddTag}>Add Tag</button> </div> <div> <h4>Current Tags:</h4> {tags.map((tag, index) => ( <span key={index} style={{ marginRight: '10px' }}> {tag} <button onClick={() => handleRemoveTag(tag)} style={{ marginLeft: '5px' }}> Remove</button> </span> ))} </div> {post && ( <div> <h3 style={{ color: 'black' }}>Post Title</h3> <p>{post.title}</p> <h3 style={{ color: 'black' }}>Post Body</h3> <p>{post.body}</p> </div> )} </div> ); }; export default PageWithTags; Output:
 Output
 Similar Reads
Functions in Next JS Next.js provides a suite of functions and hooks that enhance server-side rendering, static generation, routing, and more. These functions are essential for managing data fetching, handling requests, and optimizing performance in Next.js applications.Next.js FunctionsNext.js functions simplify server
4 min read
Tensorflow.js tf.fetch() Function Tensorflow.js is an open-source library that is developed by Google for running machine learning models as well as deep learning neural networks in the browser or node environment. The .fetch() function is used to return a platform dedicated operation of fetch. Moreover, in case fetch is specified i
1 min read
Underscore.js _.each() Function Underscore.js is a JavaScript library that provides a lot of useful functions that helps in the programming in a big way like the map, filter, invoke etc even without using any built-in objects. The _.each() function is an inbuilt function in Underscore.js library of JavaScript which is used to retu
3 min read
Next.js Data Fetching Next.js Data Fetching refers to the process of getting data from a server or an API and displaying it on a webpage. Next.js offers multiple data-fetching methods to handle server-side rendering, static generation, and client-side rendering. These methods enable you to fetch and manage data efficient
6 min read
Underscore.js _.after() Function Underscore.js is a JavaScript library that provides a lot of useful functions that help in the programming in a big way like the map, filter, invoke, etc even without using any built-in objects. The _.after() function is an inbuilt function in Underscore.js library of JavaScript which is used to cre
2 min read