Image Blending Using OpenCV
Last Updated : 06 Jan, 2025
Image blending is used in computer vision that allows us to combine two or more images over each other. For example in Augmented Reality (AR) this technique is used by AR Glasses to blend virtual objects over our reality. It is also used in creating panoramas, creating special effects and Photography.
Blending of Images Using OpenCV
To blend images using OpenCV, we will use weights over images to blend them. Here’s how we do it:
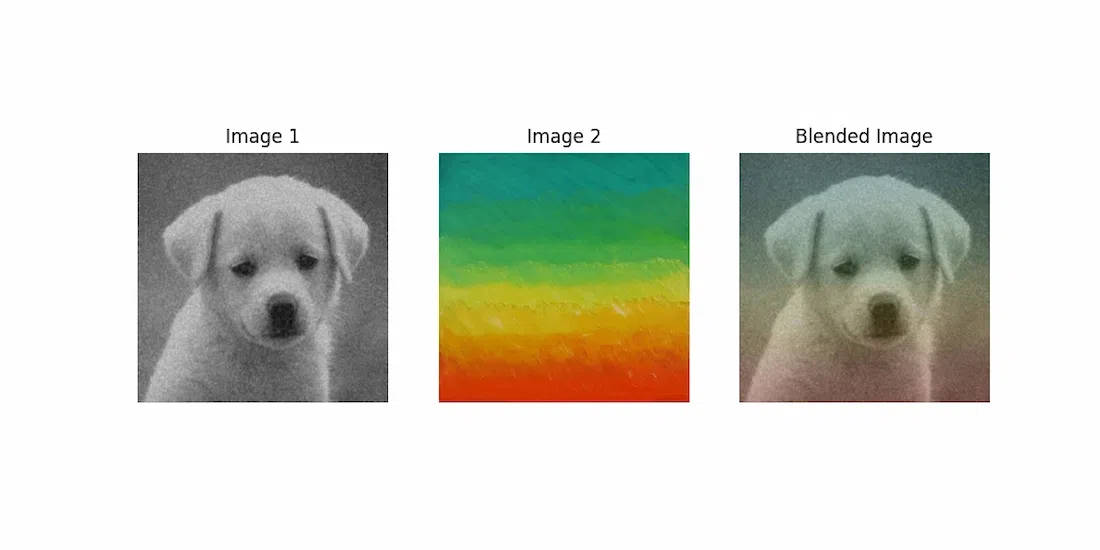
Python import cv2 import matplotlib.pyplot as plt import requests from PIL import Image from io import BytesIO import numpy as np # Image URLs image1_url = "https://encrypted-tbn0.gstatic.com/images?q=tbn:ANd9GcRmKTFI_7r2TKR0sknfK_7GJX8sHItxbf-zh_jOJIBde2-L69K29IAzFLrD&s" image2_url = "https://encrypted-tbn2.gstatic.com/images?q=tbn:ANd9GcQLVI5oqw867VkKFwDFtPaTGx2iRyLI2xth6m96yXdszR9vcfGi" response_image1 = requests.get(image1_url) response_image2 = requests.get(image2_url) img1 = Image.open(BytesIO(response_image1.content)) img2 = Image.open(BytesIO(response_image2.content)) image1 = cv2.cvtColor(np.array(img1), cv2.COLOR_RGB2BGR) image2 = cv2.cvtColor(np.array(img2), cv2.COLOR_RGB2BGR) image1 = cv2.resize(image1, (500, 500)) image2 = cv2.resize(image2, (500, 500)) # Set blending weights alpha = 0.5 beta = 0.5 blended_image = cv2.addWeighted(image1, alpha, image2, beta, 0) plt.figure(figsize=(15, 5)) plt.subplot(1, 3, 1) plt.imshow(cv2.cvtColor(image1, cv2.COLOR_BGR2RGB)) plt.title('Image 1') plt.axis('off') plt.subplot(1, 3, 2) plt.imshow(cv2.cvtColor(image2, cv2.COLOR_BGR2RGB)) plt.title('Image 2') plt.axis('off') plt.subplot(1, 3, 3) plt.imshow(cv2.cvtColor(blended_image, cv2.COLOR_BGR2RGB)) plt.title('Blended Image') plt.axis('off') plt.show() Output:
 Demonstration of Blended image
 Here Alpha and Beta refers to value (weights) for Image 1 and Image 2 respectfully. For above example, we have set the value of Alpha and Beta as 0.5.
Now lets see how different value of Alpha and Beta affects Blended Image.
Python import cv2 import matplotlib.pyplot as plt import requests from PIL import Image from io import BytesIO import numpy as np # Image URLs image1_url = "https://encrypted-tbn0.gstatic.com/images?q=tbn:ANd9GcRmKTFI_7r2TKR0sknfK_7GJX8sHItxbf-zh_jOJIBde2-L69K29IAzFLrD&s" image2_url = "https://encrypted-tbn2.gstatic.com/images?q=tbn:ANd9GcQLVI5oqw867VkKFwDFtPaTGx2iRyLI2xth6m96yXdszR9vcfGi" response_image1 = requests.get(image1_url) response_image2 = requests.get(image2_url) img1 = Image.open(BytesIO(response_image1.content)) img2 = Image.open(BytesIO(response_image2.content)) image1 = cv2.cvtColor(np.array(img1), cv2.COLOR_RGB2BGR) image2 = cv2.cvtColor(np.array(img2), cv2.COLOR_RGB2BGR) image1 = cv2.resize(image1, (500, 500)) image2 = cv2.resize(image2, (500, 500)) # Changing the values of alpha and beta alpha = 0.8 beta = 1-alpha # beta=0.2 blended_image = cv2.addWeighted(image1, alpha, image2, beta, 0) plt.figure(figsize=(15, 5)) plt.subplot(1, 3, 1) plt.imshow(cv2.cvtColor(image1, cv2.COLOR_BGR2RGB)) plt.title('Image 1') plt.axis('off') plt.subplot(1, 3, 2) plt.imshow(cv2.cvtColor(image2, cv2.COLOR_BGR2RGB)) plt.title('Image 2') plt.axis('off') plt.subplot(1, 3, 3) plt.imshow(cv2.cvtColor(blended_image, cv2.COLOR_BGR2RGB)) plt.title('Blended Image') plt.axis('off') plt.show() Output:
 Changing the blended image due to change of values of alpha and beta
 Now when we increased weights of Image 1 i.e Alpha value to 0.8 we can see prominence of Image 1 in Blended Image. Weights of Alpha and Beta combined should not exceed 1.
Image blending with OpenCV is a easy to use technique used in Computer Vision. By experimenting with different weights and images, we can achieve different results.
Similar Reads
Live Webcam Drawing using OpenCV Let us see how to draw the movement of objects captured by the webcam using OpenCV. Our program takes the video input from the webcam and tracks the objects we are moving. After identifying the objects, it will make contours precisely. After that, it will print all your drawing on the output screen.
3 min read
Python | Grayscaling of Images using OpenCV Grayscaling is the process of converting an image from other color spaces e.g. RGB, CMYK, HSV, etc. to shades of gray. It varies between complete black and complete white.Importance of grayscaling Dimension reduction: For example, In RGB images there are three color channels and three dimensions whi
5 min read
Color Identification in Images using Python - OpenCV An open-source library in Python, OpenCV is basically used for image and video processing. Not only supported by any system, such as Windows, Linux, Mac, etc. but also it can be run in any programming language like Python, C++, Java, etc. OpenCV also allows you to identify color in images. Don’t you
3 min read
Reading an image in OpenCV using Python Prerequisite: Basics of OpenCVIn this article, we'll try to open an image by using OpenCV (Open Source Computer Vision) library.  Following types of files are supported in OpenCV library:Windows bitmaps - *.bmp, *.dibJPEG files - *.jpeg, *.jpgPortable Network Graphics - *.png WebP - *.webp Sun raste
6 min read
Drawing a cross on an image with OpenCV In this article, we are going to discuss how to draw a cross on an image using OpenCV-Python. We can draw an overlay of two lines one above another to make a cross on an image. Â To draw a line on OpenCV, the below function is used. Syntax: cv2.line(image, starting Point, ending Point, color, thickn
5 min read