How to Display Dynamic AlertDialog in Android using Firebase Firestore?
Last Updated : 08 Aug, 2024
Dynamic AlertDialog is used in many different apps which are used to show different messages from dialog to the users. This type of dialog is also used for educating users with so many promotional banners. This type of alert dialog is generally dynamic and it displays images and texts which are dynamic in behavior and change after a certain interval. In this article, we will take a look at the implementation of the dynamic alert dialog box in Android.
What we are going to build in this article?
We will be building a simple alert dialog in Android. Inside that AlertDialog, we will be displaying our image and text from Firebase. The data inside our alert dialog can be changed according to our requirements. A sample GIF is given below to get an idea about what we are going to do in this article. Note that we are going to implement this project using the Java language.
Step-by-Step Implementation
Step 1: Create a new Project
To create a new project in Android Studio please refer to How to Create/Start a New Project in Android Studio. Note that select Java as the programming language.
Step 2: Connect your app to Firebase
After creating a new project navigate to the Tools option on the top bar. Inside that click on Firebase. After clicking on Firebase, you can get to see the right column mentioned below in the screenshot.

Inside that column Navigate to Firebase Cloud Firestore. Click on that option and you will get to see two options on Connect app to Firebase and Add Cloud Firestore to your app. Click on Connect now option and your app will be connected to Firebase. After that click on the second option and now your App is connected to Firebase. After connecting your app to Firebase you will get to see the below screen.

After that verify that dependency for the Firebase Firestore database has been added to our Gradle file. Navigate to the app > Gradle Scripts inside that file to check whether the below dependency is added or not. If the below dependency is not present in your build.gradle file. Add the below dependency in the dependencies section.
implementation ‘com.google.firebase:firebase-firestore:22.0.1’
After adding this dependency sync your project and now we are ready for creating our app. If you want to know more about connecting your app to Firebase. Refer to this article to get in detail about How to add Firebase to Android App.
Step 3: Working with the AndroidManifest.xml file
For adding data to Firebase we should have to give permissions for accessing the internet. For adding these permissions navigate to the app > AndroidManifest.xml and Inside that file add the below permissions to it.
XML <!--Permissions for internet--> <uses-permission android:name="android.permission.INTERNET" /> <uses-permission android:name="android.permission.ACCESS_NETWORK_STATE" />
Step 4: Working with the activity_main.xml file
As we are not displaying any UI inside our activity_main.xml file so we are not adding any UI component in our activity_main.xml because we are displaying the data in our custom layout file.
Step 5: Creating a new layout file for our alert dialog
As we are displaying one image and text inside our alert dialog. So we will be building a custom layout for our Alert Dialog. For creating a new layout file four our custom dialog box. Navigate to the app > res > layout > Right-click on it > Click on New > layout resource file and name it as custom_pop_up_layout and add below code to it.
XML <?xml version="1.0" encoding="utf-8"?> <RelativeLayout xmlns:android="http://schemas.android.com/apk/res/android" android:layout_width="match_parent" android:layout_height="wrap_content" android:layout_margin="30dp" android:background="@color/purple_500"> <!--Image view inside our dialog box--> <ImageView android:id="@+id/idIVNotification" android:layout_width="300dp" android:layout_height="300dp" android:layout_below="@id/idTVNotification" android:layout_centerHorizontal="true" android:layout_margin="20dp" /> <!--Text view inside our dialog box--> <TextView android:id="@+id/idTVNotification" android:layout_width="match_parent" android:layout_height="wrap_content" android:layout_margin="8dp" android:text="Notification Message" android:textAlignment="center" android:textColor="@color/white" android:textSize="18sp" /> </RelativeLayout>
Step 6: Working with the MainActivity.java file
Go to the MainActivity.java file and refer to the following code. Below is the code for the MainActivity.java file. Comments are added inside the code to understand the code in more detail.
Java import android.app.AlertDialog; import android.os.Bundle; import android.view.LayoutInflater; import android.view.View; import android.widget.ImageView; import android.widget.TextView; import android.widget.Toast; import androidx.annotation.Nullable; import androidx.appcompat.app.AppCompatActivity; import com.google.firebase.firestore.DocumentReference; import com.google.firebase.firestore.DocumentSnapshot; import com.google.firebase.firestore.EventListener; import com.google.firebase.firestore.FirebaseFirestore; import com.google.firebase.firestore.FirebaseFirestoreException; import com.squareup.picasso.Picasso; public class MainActivity extends AppCompatActivity { // initializing the variable for firebase firestore. FirebaseFirestore db = FirebaseFirestore.getInstance(); @Override protected void onCreate(Bundle savedInstanceState) { super.onCreate(savedInstanceState); setContentView(R.layout.activity_main); // creating a variable for our alert dialog builder. AlertDialog.Builder builder = new AlertDialog.Builder(MainActivity.this); // creating a layout inflater variable. LayoutInflater inflater = getLayoutInflater(); // below line is for inflating a custom pop up layout. View dialoglayout = inflater.inflate(R.layout.custom_pop_up_layout, null); // initializing the textview and imageview from our dialog box. TextView notificationTV = dialoglayout.findViewById(R.id.idTVNotification); ImageView notificationIV = dialoglayout.findViewById(R.id.idIVNotification); // creating a variable for document reference. DocumentReference documentReference = db.collection("MyData").document("Data"); // adding snapshot listener to our document reference. documentReference.addSnapshotListener(new EventListener<DocumentSnapshot>() { @Override public void onEvent(@Nullable DocumentSnapshot value, @Nullable FirebaseFirestoreException error) { // inside the on event method. if (error != null) { // this method is called when error is not null // and we get any error // in this case we are displaying an error message. Toast.makeText(MainActivity.this, "Error found is " + error, Toast.LENGTH_SHORT).show(); return; } if (value != null && value.exists()) { // if the value from firestore is not null then we are // getting our data and setting that data to our text view. // after getting the value from firebase firestore // we are setting it to our text view and image view. notificationTV.setText(value.getData().get("NotificationMessage").toString()); Picasso.get().load(value.getData().get("NotificationImage").toString()).into(notificationIV); } } }); // after setting the text to our text view. // we are displaying our alert dialog. builder.setView(dialoglayout); builder.show(); } }
Step 7: Adding the data to Firebase Firestore Console in Android
After adding this code go to this link to open Firebase. After clicking on this link you will get to see the below page and on this page Click on Go to Console option in the top right corner.
 Step 7 | Adding the data to firebase firestore console in android
After clicking on this screen you will get to see the below screen with your all project inside that select your project.

Inside that screen click n Firebase Firestore Database in the left window.

After clicking on Create Database option you will get to see the below screen.
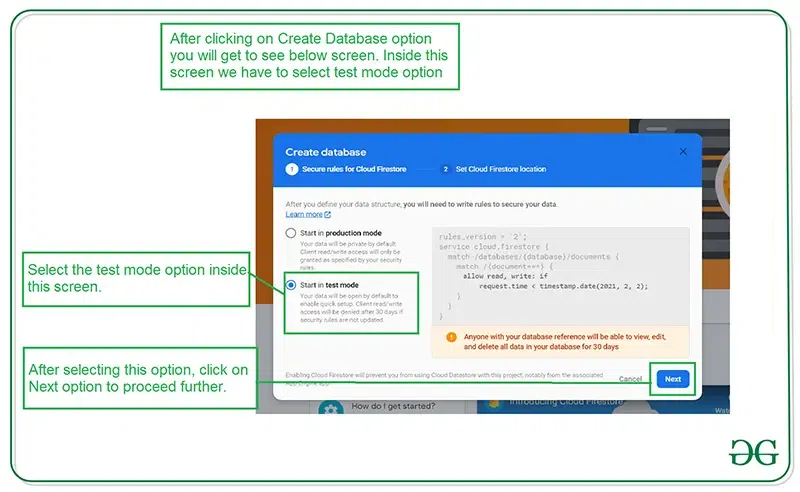
Inside this screen, we have to select the Start in test mode option. We are using test mode because we are not setting authentication inside our app. So we are selecting Start in test mode. After selecting on test mode click on the Next option and you will get to see the below screen.
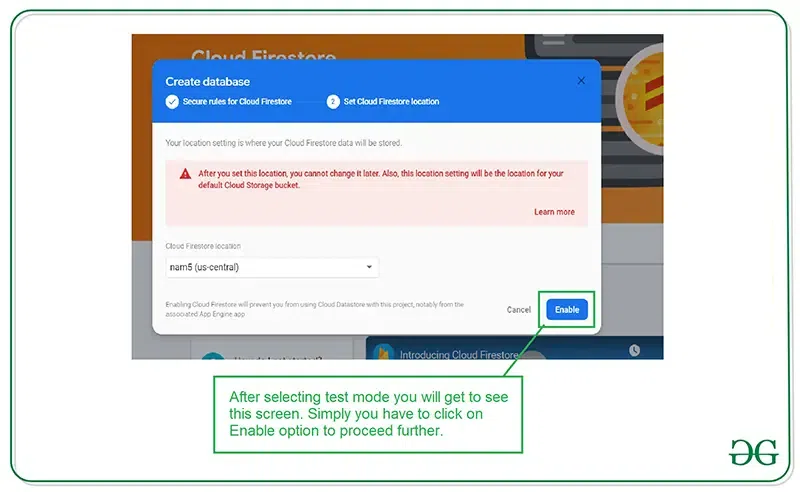
Inside this screen, we just have to click on Enable button to enable our Firebase Firestore database. After completing this process we just have to run our application and add data inside Firebase Console. For adding the data click on the Start Collection option and add your collection Name as "MyData". After adding this we have to add our Document ID as "Data". Inside the fields section, we have to add our field name as "NotificationImage" for displaying our image in the notification and enter the corresponding value of it (URL for the image). And create another file and name the field as "NotificationMessage" to display the message inside our notification. Also, enter the corresponding value of it. At last click on the Save button.

After adding data the screen will look like the following. You can edit and delete those files.

Now run the app and see the output of the app below :
Output: