How to Create Dynamic Horizontal RecyclerView in Android using Firebase Firestore?
Last Updated : 13 Aug, 2024
HorizontalRecyclerView is seen in many apps. It is generally used to display the categories in most apps and websites. This type of RecyclerView is seen in many E-commerce apps to indicate categories in the app. And this RecyclerView is also dynamic so that the admin can add or remove any item from that RecyclerView at any time. So in this article, we will take a look at creating a dynamic Horizontal Recycler View in Android using Firebase. We will be using Firebase Firestore to display the items of RecyclerView.
What we are going to build in this article?
We will be building a simple application in which we will be displaying a horizontal RecyclerView in which we will be showing different technologies used in Computer Science. So we will represent this amazing computer technology in our Horizontal RecyclerView. A sample GIF is given below to get an idea about what we are going to do in this article. Note that we are going to implement this project using the Java language.
Step-by-Step Implementation
Step 1: Create a new Project
To create a new project in Android Studio please refer to How to Create/Start a New Project in Android Studio. Note that select Java as the programming language.
Step 2: Connect your app to Firebase
After creating a new project navigate to the Tools option on the top bar. Inside that click on Firebase. After clicking on Firebase, you can get to see the right column mentioned below in the screenshot.

Inside that column Navigate to Firebase Cloud Firestore. Click on that option and you will get to see two options on Connect app to Firebase and Add Cloud Firestore to your app. Click on Connect now option and your app will be connected to Firebase. After that click on the second option and now your App is connected to Firebase. After connecting your app to Firebase you will get to see the below screen.

After that verify that dependency for the Firebase Firestore database has been added to our Gradle file. Navigate to the app > Gradle Scripts inside that file to check whether the below dependency is added or not. If the below dependency is not present in your build.gradle file. Add the below dependency in the dependencies section.
implementation ‘com.google.firebase:firebase-firestore:22.0.1’
After adding this dependency sync your project and now we are ready for creating our app. If you want to know more about connecting your app to Firebase. Refer to this article to get in detail about How to add Firebase to Android App.
Step 3: Working with the AndroidManifest.xml file
For adding data to Firebase we should have to give permissions for accessing the internet. For adding these permissions navigate to the app > AndroidManifest.xml and Inside that file add the below permissions to it.
XML <!--Permissions for internet--> <uses-permission android:name="android.permission.INTERNET" /> <uses-permission android:name="android.permission.ACCESS_NETWORK_STATE" />
Step 4: Working with the activity_main.xml file
Go to the activity_main.xml file and refer to the following code. Below is the code for the activity_main.xml file.
XML <?xml version="1.0" encoding="utf-8"?> <LinearLayout xmlns:android="http://schemas.android.com/apk/res/android" xmlns:tools="http://schemas.android.com/tools" android:layout_width="match_parent" android:layout_height="match_parent" android:orientation="vertical" tools:context=".MainActivity"> <TextView android:layout_width="match_parent" android:layout_height="wrap_content" android:padding="10dp" android:text="Dynamic Horizontal Recycler View" android:textAlignment="center" android:textColor="@color/purple_500" android:textSize="15sp" /> <androidx.recyclerview.widget.RecyclerView android:id="@+id/idRVItems" android:layout_width="match_parent" android:layout_height="wrap_content" android:layout_marginTop="40dp" android:background="@color/purple_500" /> </LinearLayout>
Step 5: Now we will create a new Java class for storing our data
For reading data from the Firebase Firestore database, we have to create an Object class and we will read data inside this class. For creating an object class, navigate to the app > java > your app's package name > Right-click on it and click on New > Java Class > Give a name to your class. Here we have given the name as DataModal and add the below code to it.
Java public class DataModal { // variables for storing our image and name. private String name; private String imgUrl; public DataModal() { // empty constructor required for firebase. } // constructor for our object class. public DataModal(String name, String imgUrl) { this.name = name; this.imgUrl = imgUrl; } // getter and setter methods public String getName() { return name; } public void setName(String name) { this.name = name; } public String getImgUrl() { return imgUrl; } public void setImgUrl(String imgUrl) { this.imgUrl = imgUrl; } } Step 6: Now we will create a layout file for our item of RecyclerView
Navigate to the app > res > layout > Right-click on it and click on New > Layout Resource File and give a name to that file. After creating that file add the below code to it. Here we have given the name as image_rv_item and add the below code to it.
XML <?xml version="1.0" encoding="utf-8"?> <LinearLayout xmlns:android="http://schemas.android.com/apk/res/android" android:layout_width="wrap_content" android:layout_height="wrap_content" android:layout_gravity="center" android:gravity="center" android:orientation="vertical"> <!--Image view for displaying our image--> <ImageView android:id="@+id/idIVimage" android:layout_width="100dp" android:layout_height="100dp" android:layout_margin="4dp" android:background="@color/white" android:backgroundTint="@color/white" android:padding="3dp" /> <!--Text view for displaying our text --> <TextView android:id="@+id/idTVtext" android:layout_width="wrap_content" android:layout_height="wrap_content" android:layout_margin="2dp" android:padding="3dp" android:text="Category Text" android:textAlignment="center" android:textColor="@color/white" /> </LinearLayout>
Step 7: Now we will move towards creating an Adapter class
For creating a new Adapter class navigate to the app > java > your app's package name > Right-click on it and Click on New > Java class and name your java class as DataRVAdapter and add below code to it. Comments are added inside the code to understand the code in more detail.
Java import android.content.Context; import android.view.LayoutInflater; import android.view.View; import android.view.ViewGroup; import android.widget.ImageView; import android.widget.TextView; import android.widget.Toast; import androidx.annotation.NonNull; import androidx.recyclerview.widget.RecyclerView; import com.squareup.picasso.Picasso; import java.util.ArrayList; public class DataRVAdapter extends RecyclerView.Adapter<DataRVAdapter.ViewHolder> { private ArrayList<DataModal> dataModalArrayList; private Context context; // constructor class for our Adapter public DataRVAdapter(ArrayList<DataModal> dataModalArrayList, Context context) { this.dataModalArrayList = dataModalArrayList; this.context = context; } @NonNull @Override public DataRVAdapter.ViewHolder onCreateViewHolder(@NonNull ViewGroup parent, int viewType) { // passing our layout file for displaying our card item return new DataRVAdapter.ViewHolder(LayoutInflater.from(context).inflate(R.layout.image_rv_item, parent, false)); } @Override public void onBindViewHolder(@NonNull DataRVAdapter.ViewHolder holder, int position) { // setting data to our views in Recycler view items. DataModal modal = dataModalArrayList.get(position); holder.courseNameTV.setText(modal.getName()); // we are using Picasso to load images // from URL inside our image view. Picasso.get().load(modal.getImgUrl()).into(holder.courseIV); holder.itemView.setOnClickListener(new View.OnClickListener() { @Override public void onClick(View v) { // setting on click listener // for our items of recycler items. Toast.makeText(context, "Clicked item is " + modal.getName(), Toast.LENGTH_SHORT).show(); } }); } @Override public int getItemCount() { // returning the size of array list. return dataModalArrayList.size(); } public class ViewHolder extends RecyclerView.ViewHolder { // creating variables for our // views of recycler items. private TextView courseNameTV; private ImageView courseIV; public ViewHolder(@NonNull View itemView) { super(itemView); // initializing the views of recycler views. courseNameTV = itemView.findViewById(R.id.idTVtext); courseIV = itemView.findViewById(R.id.idIVimage); } } } Step 8: Working with the MainActivity.java file
Go to the MainActivity.java file and refer to the following code. Below is the code for the MainActivity.java file. Comments are added inside the code to understand the code in more detail.
Java import android.os.Bundle; import android.widget.Toast; import androidx.annotation.NonNull; import androidx.appcompat.app.AppCompatActivity; import androidx.recyclerview.widget.LinearLayoutManager; import androidx.recyclerview.widget.RecyclerView; import com.google.android.gms.tasks.OnFailureListener; import com.google.android.gms.tasks.OnSuccessListener; import com.google.firebase.firestore.DocumentSnapshot; import com.google.firebase.firestore.FirebaseFirestore; import com.google.firebase.firestore.QuerySnapshot; import java.util.ArrayList; import java.util.List; public class MainActivity extends AppCompatActivity { private RecyclerView courseRV; private ArrayList<DataModal> dataModalArrayList; private DataRVAdapter dataRVAdapter; private FirebaseFirestore db; @Override protected void onCreate(Bundle savedInstanceState) { super.onCreate(savedInstanceState); setContentView(R.layout.activity_main); // initializing our variables. courseRV = findViewById(R.id.idRVItems); // initializing our variable for firebase // firestore and getting its instance. db = FirebaseFirestore.getInstance(); // creating our new array list dataModalArrayList = new ArrayList<>(); courseRV.setHasFixedSize(true); // adding horizontal layout manager for our recycler // view. courseRV.setLayoutManager(new LinearLayoutManager( this, LinearLayoutManager.HORIZONTAL, false)); // adding our array list to our recycler view // adapter class. dataRVAdapter = new DataRVAdapter(dataModalArrayList, this); // setting adapter to our recycler view. courseRV.setAdapter(dataRVAdapter); loadrecyclerViewData(); } private void loadrecyclerViewData() { db.collection("Data") .get() .addOnSuccessListener(new OnSuccessListener< QuerySnapshot>() { @Override public void onSuccess( QuerySnapshot queryDocumentSnapshots) { // after getting the data we are calling // on success method and inside this // method we are checking if the // received query snapshot is empty or // not. if (!queryDocumentSnapshots.isEmpty()) { // if the snapshot is not empty we // are hiding our progress bar and // adding our data in a list. List<DocumentSnapshot> list = queryDocumentSnapshots .getDocuments(); for (DocumentSnapshot d : list) { // after getting this list we // are passing that list to our // object class. DataModal dataModal = d.toObject( DataModal.class); // and we will pass this object // class inside our arraylist // which we have created for // recycler view. dataModalArrayList.add( dataModal); } // after adding the data to recycler // view. we are calling recycler // view notifyDataSetChanged method // to notify that data has been // changed in recycler view. dataRVAdapter .notifyDataSetChanged(); } else { // if the snapshot is empty we are // displaying a toast message. Toast .makeText( MainActivity.this, "No data found in Database", Toast.LENGTH_SHORT) .show(); } } }) .addOnFailureListener(new OnFailureListener() { @Override public void onFailure(@NonNull Exception e) { // if we do not get any data or any // error we are displaying a toast // message that we do not get any data Toast .makeText(MainActivity.this, "Fail to get the data.", Toast.LENGTH_SHORT) .show(); } }); } } Step 9: Now add the data to your Firebase Console
Search for Firebase in your browser and go to that website and you will get to see the below screen.

After clicking on Go to Console option. Click on your project which is shown below.

After clicking on your project you will get to see the below screen. After clicking on this project you will get to see the below screen.

After clicking on the Create Database option you will get to see the below screen.
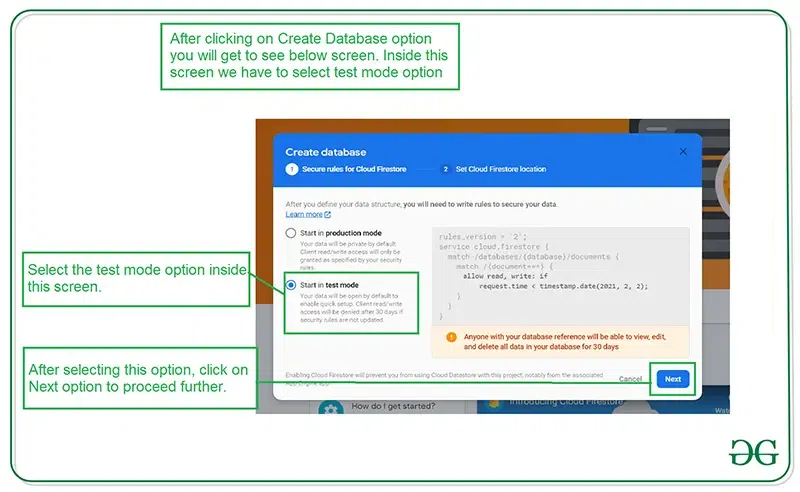
Inside this screen, we have to select the Start in test mode option. We are using test mode because we are not setting authentication inside our app. So we are selecting Start in test mode. After selecting on test mode click on the Next option and you will get to see the below screen.
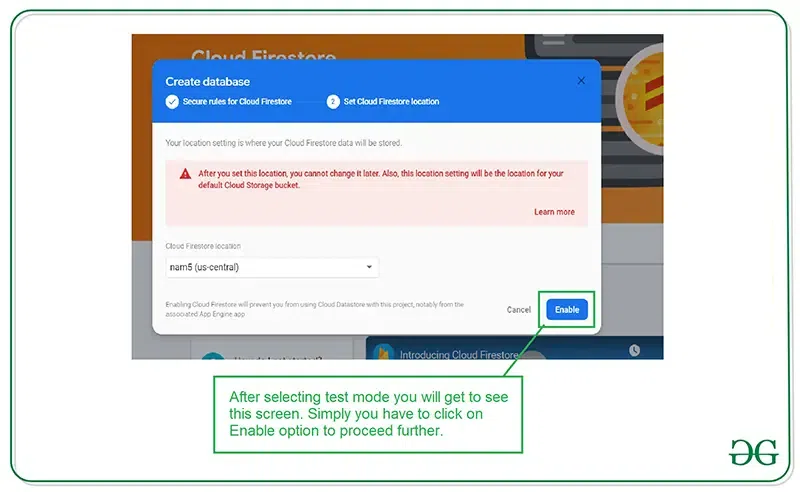
Inside this screen, we just have to click on the Enable button to enable our Firebase Firestore database. After completing this process we have to add the data inside our Firebase Console. For adding data to our Firebase Console.
You have to click on Start Collection Option and give the collection name as Data. After creating a collection you have to click on Autoid option for creating the first document. Then create two fields, one filed for "name" and one filed for "imgUrl" and enter the corresponding values for them. Note that specify the image URL link in the value for the imgUrl filed. And click on the Save button. Your first image to the Data has been added.

Similarly, add more images by clicking on the “Add document” button.

After adding these images run your app and you will get to see the output on the below screen.
Output: