Skip to content
geeksforgeeks
  • Tutorials
    • Python
    • Java
    • Data Structures & Algorithms
    • ML & Data Science
    • Interview Corner
    • Programming Languages
    • Web Development
    • CS Subjects
    • DevOps And Linux
    • School Learning
    • Practice Coding Problems
  • Courses
    • DSA to Development
    • Get IBM Certification
    • Newly Launched!
      • Master Django Framework
      • Become AWS Certified
    • For Working Professionals
      • Interview 101: DSA & System Design
      • Data Science Training Program
      • JAVA Backend Development (Live)
      • DevOps Engineering (LIVE)
      • Data Structures & Algorithms in Python
    • For Students
      • Placement Preparation Course
      • Data Science (Live)
      • Data Structure & Algorithm-Self Paced (C++/JAVA)
      • Master Competitive Programming (Live)
      • Full Stack Development with React & Node JS (Live)
    • Full Stack Development
    • Data Science Program
    • All Courses
  • Java for Android
  • Android Studio
  • Android Kotlin
  • Kotlin
  • Flutter
  • Dart
  • Android Project
  • Android Interview
Open In App
Next Article:
How to Align Navigation Drawer and its Elements towards the Left or Right of the Screen in Android?
Next article icon

How to Align Navigation Drawer and its Elements towards the Left or Right of the Screen in Android?

Last Updated : 15 Oct, 2020
Comments
Improve
Suggest changes
Like Article
Like
Report

The Navigation Drawer is a layout that can be seen in certain applications, that consists of some other activity shortcuts (Intents). This drawer generally can be seen at the left edge of the screen, which is by default. A Button to access the Navigation Drawer is by default provided at the action bar. 
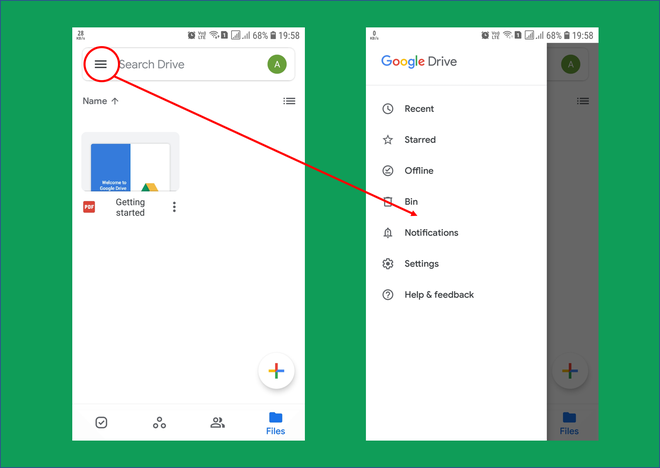
Example of Google Drive Navigation Drawer.

So now the question is why is it is necessary to align the Navigation Drawer and its elements towards the left or right of the screen. It is necessary because a screen can represent multiple layouts at a time. To keep all these elements fixed at desired positions, and sizes, each and every entity of these elements must be initialized. Though it is not necessary to initiate these entities in applications representing a single layout, it is always a better practice to initiate all the entities. In view of generating different styling for an application, one would like to implement a drawer toward the right of the screen with elements aligned towards left and other possible versions. Through this article, we want to extend the implementation of a Navigation Drawer and align it and its elements respectively.

Approach

Step 1: Create a New Project

Create a Navigation Drawer Activity in Android Studio. To create a new project in Android Studio please refer to How to Create/Start a New Project in Android Studio. As you click finish, the project builds, might take a minute or two.

Step 2: Working with the activity_main.xml file

When the setup is ready, go to the activity_main.xml file, which represents the UI of the project. Below is the code for the activity_main.xml file for different cases. Note that we are going to modify only the activity_main.xml file in each case.

Align Navigation Drawer towards the Left of the screen:

PS: "ltr" means left to right.

XML
<?xml version="1.0" encoding="utf-8"?> <androidx.drawerlayout.widget.DrawerLayout      xmlns:android="http://schemas.android.com/apk/res/android"     xmlns:app="http://schemas.android.com/apk/res-auto"     xmlns:tools="http://schemas.android.com/tools"     android:id="@+id/drawer_layout"     android:layout_width="match_parent"     android:layout_height="match_parent"     android:fitsSystemWindows="true"                                                 android:layoutDirection="ltr"      tools:openDrawer="start"><!--set layoutDirection to 'ltr'-->      <include         layout="@layout/app_bar_main"         android:layout_width="match_parent"         android:layout_height="match_parent" />      <com.google.android.material.navigation.NavigationView         android:id="@+id/nav_view"         android:layout_width="wrap_content"         android:layout_height="match_parent"         android:layout_gravity="start"         android:fitsSystemWindows="true"         app:headerLayout="@layout/nav_header_main"         app:menu="@menu/activity_main_drawer" />      </androidx.drawerlayout.widget.DrawerLayout> 

Output: Run on Emulator

Align Navigation Drawer towards the Right of the screen:

The approach is quite similar to the previous one. Changes are made only within the drawer layout.

PS: "rtl" means right to left

XML
<?xml version="1.0" encoding="utf-8"?> <androidx.drawerlayout.widget.DrawerLayout      xmlns:android="http://schemas.android.com/apk/res/android"     xmlns:app="http://schemas.android.com/apk/res-auto"     xmlns:tools="http://schemas.android.com/tools"     android:id="@+id/drawer_layout"     android:layout_width="match_parent"     android:layout_height="match_parent"     android:fitsSystemWindows="true"                                                 android:layoutDirection="rtl"      tools:openDrawer="start"><!--set layoutDirection to 'rtl',                                   else by default is left:-->      <include         layout="@layout/app_bar_main"         android:layout_width="match_parent"         android:layout_height="match_parent" />      <com.google.android.material.navigation.NavigationView         android:id="@+id/nav_view"         android:layout_width="wrap_content"         android:layout_height="match_parent"         android:layout_gravity="start"         android:fitsSystemWindows="true"         app:headerLayout="@layout/nav_header_main"         app:menu="@menu/activity_main_drawer" />      </androidx.drawerlayout.widget.DrawerLayout> 

Output: Run on Emulator


Align Navigation Drawer Elements towards the left of the Drawer (by Default):

XML
<?xml version="1.0" encoding="utf-8"?> <androidx.drawerlayout.widget.DrawerLayout      xmlns:android="http://schemas.android.com/apk/res/android"     xmlns:app="http://schemas.android.com/apk/res-auto"     xmlns:tools="http://schemas.android.com/tools"     android:id="@+id/drawer_layout"     android:layout_width="match_parent"     android:layout_height="match_parent"     android:fitsSystemWindows="true"     tools:openDrawer="start">      <include         layout="@layout/app_bar_main"         android:layout_width="match_parent"         android:layout_height="match_parent" />      <com.google.android.material.navigation.NavigationView         android:id="@+id/nav_view"         android:layout_width="wrap_content"         android:layout_height="match_parent"         android:layout_gravity="start"         android:fitsSystemWindows="true"         app:headerLayout="@layout/nav_header_main"         app:menu="@menu/activity_main_drawer"              android:layoutDirection="ltr"/><!--set layoutDirection to 'ltr'-->      </androidx.drawerlayout.widget.DrawerLayout> 

Output: Run on Emulator

Align Navigation Drawer Elements towards the Right of the Drawer:

XML
<?xml version="1.0" encoding="utf-8"?> <androidx.drawerlayout.widget.DrawerLayout     xmlns:android="http://schemas.android.com/apk/res/android"     xmlns:app="http://schemas.android.com/apk/res-auto"     xmlns:tools="http://schemas.android.com/tools"     android:id="@+id/drawer_layout"     android:layout_width="match_parent"     android:layout_height="match_parent"     android:fitsSystemWindows="true"     tools:openDrawer="start">      <include         layout="@layout/app_bar_main"         android:layout_width="match_parent"         android:layout_height="match_parent" />      <com.google.android.material.navigation.NavigationView         android:id="@+id/nav_view"         android:layout_width="wrap_content"         android:layout_height="match_parent"         android:layout_gravity="start"         android:fitsSystemWindows="true"         app:headerLayout="@layout/nav_header_main"         app:menu="@menu/activity_main_drawer"          android:layoutDirection="rtl"/><!--set layoutDirection to 'rtl',                                            else by default is left-->  </androidx.drawerlayout.widget.DrawerLayout> 

Output: Run on Emulator


Next Article
How to Align Navigation Drawer and its Elements towards the Left or Right of the Screen in Android?

A

aashaypawar
Improve
Article Tags :
  • Android

Similar Reads

    How to Change the Text Font of Side Navigation Drawer Items in Android?
    The navigation drawer is the most common feature offered by android and the navigation drawer is a UI panel that shows your app’s main navigation menu. It is also one of the important UI elements, which provides actions preferable to the users like example changing user profile, changing settings of
    2 min read
    How to Make an Alert Dialog Fill Majority of the Screen Size in Android?
    An Alert Dialog is a window that appears on the screen to give notifications to the user, make some decisions for the user, or enter some information from the user. An Alert Dialog is generally not full screen, but in this article, we'll be implementing something similar. Building an Alert Dialog:Ti
    3 min read
    How to Grouping Navigation Drawer Menu Items in Android?
    Navigation Drawer or Slider Drawer is a UI pattern, used in Mobile Applications and Websites. It is used to provide easy access to different features or parts of an app or website.Functioning of Navigation DrawerIt is usually accessed by tapping on the hamburger menu icon (3 horizontal lines), prese
    4 min read
    How to Add Icons in Navigation Drawer in Android?
    Android navigation drawer is a user interface that shows the app's main navigation menu. It appears when the user touches the drawer icon in the app bar or when the user swipes their fingers or does some kind of action on the screen. It is not visible by default and it needs to open either by slidin
    2 min read
    How to Check Navigation Drawer Menu Items in Android?
    Navigation Drawer or Slider Drawer is a UI component that is used in Mobile Applications and Websites to provide easy access to different features or parts of an app or website. Functioning of Navigation Drawer It is generally accessed by tapping on the hamburger menu icon (3 horizontal lines), pres
    4 min read
geeksforgeeks-footer-logo
Corporate & Communications Address:
A-143, 7th Floor, Sovereign Corporate Tower, Sector- 136, Noida, Uttar Pradesh (201305)
Registered Address:
K 061, Tower K, Gulshan Vivante Apartment, Sector 137, Noida, Gautam Buddh Nagar, Uttar Pradesh, 201305
GFG App on Play Store GFG App on App Store
Advertise with us
  • Company
  • About Us
  • Legal
  • Privacy Policy
  • In Media
  • Contact Us
  • Advertise with us
  • GFG Corporate Solution
  • Placement Training Program
  • Languages
  • Python
  • Java
  • C++
  • PHP
  • GoLang
  • SQL
  • R Language
  • Android Tutorial
  • Tutorials Archive
  • DSA
  • Data Structures
  • Algorithms
  • DSA for Beginners
  • Basic DSA Problems
  • DSA Roadmap
  • Top 100 DSA Interview Problems
  • DSA Roadmap by Sandeep Jain
  • All Cheat Sheets
  • Data Science & ML
  • Data Science With Python
  • Data Science For Beginner
  • Machine Learning
  • ML Maths
  • Data Visualisation
  • Pandas
  • NumPy
  • NLP
  • Deep Learning
  • Web Technologies
  • HTML
  • CSS
  • JavaScript
  • TypeScript
  • ReactJS
  • NextJS
  • Bootstrap
  • Web Design
  • Python Tutorial
  • Python Programming Examples
  • Python Projects
  • Python Tkinter
  • Python Web Scraping
  • OpenCV Tutorial
  • Python Interview Question
  • Django
  • Computer Science
  • Operating Systems
  • Computer Network
  • Database Management System
  • Software Engineering
  • Digital Logic Design
  • Engineering Maths
  • Software Development
  • Software Testing
  • DevOps
  • Git
  • Linux
  • AWS
  • Docker
  • Kubernetes
  • Azure
  • GCP
  • DevOps Roadmap
  • System Design
  • High Level Design
  • Low Level Design
  • UML Diagrams
  • Interview Guide
  • Design Patterns
  • OOAD
  • System Design Bootcamp
  • Interview Questions
  • Inteview Preparation
  • Competitive Programming
  • Top DS or Algo for CP
  • Company-Wise Recruitment Process
  • Company-Wise Preparation
  • Aptitude Preparation
  • Puzzles
  • School Subjects
  • Mathematics
  • Physics
  • Chemistry
  • Biology
  • Social Science
  • English Grammar
  • Commerce
  • World GK
  • GeeksforGeeks Videos
  • DSA
  • Python
  • Java
  • C++
  • Web Development
  • Data Science
  • CS Subjects
@GeeksforGeeks, Sanchhaya Education Private Limited, All rights reserved
We use cookies to ensure you have the best browsing experience on our website. By using our site, you acknowledge that you have read and understood our Cookie Policy & Privacy Policy
Lightbox
Improvement
Suggest Changes
Help us improve. Share your suggestions to enhance the article. Contribute your expertise and make a difference in the GeeksforGeeks portal.
geeksforgeeks-suggest-icon
Create Improvement
Enhance the article with your expertise. Contribute to the GeeksforGeeks community and help create better learning resources for all.
geeksforgeeks-improvement-icon
Suggest Changes
min 4 words, max Words Limit:1000

Thank You!

Your suggestions are valuable to us.

What kind of Experience do you want to share?

Interview Experiences
Admission Experiences
Career Journeys
Work Experiences
Campus Experiences
Competitive Exam Experiences