
Google Cloud Spanner 是一种全代管式可横向扩容的关系型数据库服务,可提供 ACID 事务和 SQL 语义,而不会提升性能和高可用性。
在本实验中,您将学习如何设置 Cloud Spanner 实例。我们将逐步说明如何创建可用于游戏排行榜的数据库和架构。首先,创建一个用于存储玩家信息的玩家表和一个用于存储玩家得分的得分表。
接下来,您将使用示例数据填充表。然后,您将通过运行前十名示例查询并最终删除实例以释放资源来结束本实验。
您将学习的内容
- 如何设置 Cloud Spanner 实例。
- 如何创建数据库和表。
- 如何使用提交时间戳列。
- 如何使用时间戳将数据加载到您的 Cloud Spanner 数据库表中。
- 如何查询您的 Cloud Spanner 数据库。
- 如何删除 Cloud Spanner 实例。
所需条件
您打算如何使用本教程?
如何评价您使用 Google Cloud Platform 的体验?
自定进度的环境设置
如果您还没有 Google 帐号(Gmail 或 Google Apps),则必须创建一个。登录 Google Cloud Platform Console (console.cloud.google.com) 并创建一个新项目。
如果您已经有一个项目,请点击控制台左上方的项目选择下拉菜单:

然后在出现的对话框中点击“新建项目”按钮以创建一个新项目:

如果您还没有项目,则应该看到一个类似这样的对话框来创建您的第一个项目:

随后的项目创建对话框可让您输入新项目的详细信息:

请记住项目 ID,该 ID 在所有 Google Cloud 项目中都是唯一的名称(上面的名称已经被使用,对您不起作用,对不起!)。此 Codelab 稍后将在 PROJECT_ID 中引用它。
接下来,如果尚未执行此操作,则需要在 Developers Console 中启用结算功能,以便使用 Google Cloud 资源并启用 Cloud Spanner API。

在此 Codelab 中运行不会花费您超过几美元,但是如果您决定使用更多的资源或让它们运行(请参阅本文档末尾的“清理”部分),则可能会花费更多。如需了解 Google Cloud Spanner 价格,请参阅此处。
Google Cloud Platform 的新用户均有资格获享 $300 赠金,免费试用此 Codelab。
Google Cloud Shell 设置
虽然 Google Cloud 和 Spanner 可以从笔记本电脑远程操作,但在此 Codelab 中,我们将使用 Google Cloud Shell,这是一个在云端运行的命令行环境。
这个基于 Debian 的虚拟机加载了您所需的所有开发工具。它提供了一个持久的 5GB 主目录,并且在 Google Cloud 中运行,大大增强了网络性能和身份验证。也就是说,Codelab 只需要一个浏览器(是的,它可在 Chromebook 上进行)。
- 如需从 Cloud Console 激活 Cloud Shell,只需点击激活 Cloud Shell
(预配和连接到环境仅需花费一些时间)。


在连接到 Cloud Shell 后,您应该会看到自己已通过身份验证,并且相关项目已设置为您的 PROJECT_ID。
gcloud auth list
命令输出
Credentialed accounts: - <myaccount>@<mydomain>.com (active)
gcloud config list project
命令输出
[core] project = <PROJECT_ID>
如果由于某种原因无法设置项目,只需发出以下命令:
gcloud config set project <PROJECT_ID>
正在查找您的 PROJECT_ID?检查您在设置步骤中使用的 ID,或在 Cloud Console 信息中心查找该 ID:

默认情况下,Cloud Shell 还会设置一些环境变量,这对您日后运行命令可能会很有用。
echo $GOOGLE_CLOUD_PROJECT
命令输出
<PROJECT_ID>
- 最后,设置默认可用区和项目配置。
gcloud config set compute/zone us-central1-f
您可以选择各种不同的可用区。如需了解详情,请参阅区域和可用区。
摘要
在此步骤中,您将设置环境。
下一步
接下来,您将设置 Cloud Spanner 实例。
在此步骤中,我们会为此 Codelab 设置 Cloud Spanner 实例。搜索左上角汉堡式菜单中的  Spanner 条目
  ,也可以按“/”并输入“Spanner”以搜索 Spanner。

接下来,点击  并填写表单,方法是为您的实例输入实例名称 cloudspanner-leaderboard,选择配置(选择区域实例),并设置节点数,对于此 Codelab,我们仅需要一个节点。对于生产实例并符合 Cloud Spanner SLA 的资格,您将需要在 Cloud Spanner 实例中运行 3 个或更多节点。
最后但并非最不重要的一点是,点击“创建”,然后在几秒钟内就可以使用 Cloud Spanner 实例。

在下一步中,我们将使用 Java 客户端库在新实例中创建数据库和架构。
在此步骤中,我们将创建示例数据库和架构。
让我们使用 Java 客户端库创建两个表;一个用于玩家信息的玩家表和一个用于存储玩家得分的得分表。为此,我们将逐步介绍在 Cloud Shell 中创建 Java 控制台应用的步骤。
首先,通过在 Cloud Shell 中键入以下命令,从 GitHub 克隆此 Codelab 的示例代码:
git clone https://github.com/GoogleCloudPlatform/java-docs-samples.git 然后将目录更改为创建应用的“应用”目录。
cd java-docs-samples/spanner/leaderboard 此 Codelab 所需的所有代码都作为一个可运行的 C# 应用位于现有 java-docs-samples/spanner/leaderboard/complete 目录中,该应用命名为 Leaderboard 在您逐步通过 Codelab 时可作为参考。我们将创建一个新目录,并分阶段构建排行榜应用的副本。
为应用创建一个名为“Codelab”的新目录,并使用以下命令将目录切换到该目录:
mkdir codelab && cd $_ 使用以下 Maven (mvn) 命令,创建名为“排行榜”的新基本 Java 应用:
mvn -B archetype:generate -DarchetypeGroupId=org.apache.maven.archetypes -DgroupId=com.google.codelabs -DartifactId=leaderboard -DarchetypeVersion=1.4 此命令会创建一个简单控制台应用,其中包含两个文件(Maven 应用配置文件 pom.xml 和 Java 应用文件 App.java)。
接下来,将目录更改为刚刚创建的排行榜目录并列出其内容:
cd leaderboard && ls 您应该会看到列出的 pom.xml 文件和 src 目录:
pom.xml src 现在,让我们编辑 App.java 以使用 Java Spanner 客户端库,以创建由两个表格组成的排行榜;玩家和得分。您可以直接在 Cloud Shell Editor 中执行此操作:
通过点击下面突出显示的图标,打开 Cloud Shell Editor:

打开排行榜文件夹下的 pom.xml。打开位于 java-docs-samples\ spanner\leaderboard\codelab\leaderboard 文件夹中的 pom.xml 文件。此文件配置 maven 编译系统,将您的应用编译为 jar 文件,包括我们的所有依赖项。
在现有的 </properties> 元素下方添加以下 1 个新的依赖项管理部分:
<dependencyManagement> <dependencies> <dependency> <groupId>com.google.cloud</groupId> <artifactId>google-cloud-bom</artifactId> <version>0.83.0-alpha</version> <type>pom</type> <scope>import</scope> </dependency> </dependencies> </dependencyManagement> 此外,还要在现有的 <dependencies> 部分添加 1 个新依赖项,以向应用添加 Cloud Spanner Java 客户端库。
<dependency> <!-- Version auto-managed by BOM --> <groupId>com.google.cloud</groupId> <artifactId>google-cloud-spanner</artifactId> </dependency> 然后将 pom.xml 文件的现有 <build> 部分替换为以下 <build> 部分:
<build> <plugins> <plugin> <artifactId>maven-assembly-plugin</artifactId> <version>2.5.5</version> <configuration> <finalName>leaderboard</finalName> <descriptorRefs> <descriptorRef>jar-with-dependencies</descriptorRef> </descriptorRefs> <archive> <manifest> <mainClass>com.google.codelabs.App</mainClass> </manifest> </archive> <appendAssemblyId>false</appendAssemblyId> <attach>false</attach> </configuration> <executions> <execution> <id>make-assembly</id> <phase>package</phase> <goals> <goal>single</goal> </goals> </execution> </executions> </plugin> <plugin> <groupId>org.apache.maven.plugins</groupId> <artifactId>maven-failsafe-plugin</artifactId> <version>3.0.0-M3</version> </plugin> <plugin> <groupId>org.apache.maven.plugins</groupId> <artifactId>maven-surefire-plugin</artifactId> <version>3.0.0-M3</version> <configuration> <useSystemClassLoader>false</useSystemClassLoader> </configuration> </plugin> </plugins> </build> 在 Cloud Shell Editor 的“文件”菜单下选择“保存”,或同时按“Ctrl”和“S”键盘快捷键,保存您对 pom.xml 文件所做的更改。
接下来,在 src/main/java/com/google/codelabs/ 文件夹中的 Cloud Shell Editor 中打开 App.java 文件。通过将以下 Java 代码粘贴到 App.java 文件中,将文件的现有代码替换为创建 leaderboard 数据库以及 Players 和 Scores 表所需的代码:
package com.google.codelabs; import com.google.api.gax.longrunning.OperationFuture; import com.google.cloud.spanner.Database; import com.google.cloud.spanner.DatabaseAdminClient; import com.google.cloud.spanner.DatabaseClient; import com.google.cloud.spanner.DatabaseId; import com.google.cloud.spanner.Spanner; import com.google.cloud.spanner.SpannerException; import com.google.cloud.spanner.SpannerExceptionFactory; import com.google.cloud.spanner.SpannerOptions; import com.google.spanner.admin.database.v1.CreateDatabaseMetadata; import java.util.Arrays; import java.util.concurrent.ExecutionException; /** * Example code for using the Cloud Spanner API with the Google Cloud Java client library * to create a simple leaderboard. * * This example demonstrates: * * <p> * * <ul> * <li>Creating a Cloud Spanner database. * </ul> */ public class App { static void create(DatabaseAdminClient dbAdminClient, DatabaseId db) { OperationFuture<Database, CreateDatabaseMetadata> op = dbAdminClient.createDatabase( db.getInstanceId().getInstance(), db.getDatabase(), Arrays.asList( "CREATE TABLE Players(\n" + " PlayerId INT64 NOT NULL,\n" + " PlayerName STRING(2048) NOT NULL\n" + ") PRIMARY KEY(PlayerId)", "CREATE TABLE Scores(\n" + " PlayerId INT64 NOT NULL,\n" + " Score INT64 NOT NULL,\n" + " Timestamp TIMESTAMP NOT NULL\n" + " OPTIONS(allow_commit_timestamp=true)\n" + ") PRIMARY KEY(PlayerId, Timestamp),\n" + "INTERLEAVE IN PARENT Players ON DELETE NO ACTION")); try { // Initiate the request which returns an OperationFuture. Database dbOperation = op.get(); System.out.println("Created database [" + dbOperation.getId() + "]"); } catch (ExecutionException e) { // If the operation failed during execution, expose the cause. throw (SpannerException) e.getCause(); } catch (InterruptedException e) { // Throw when a thread is waiting, sleeping, or otherwise occupied, // and the thread is interrupted, either before or during the activity. throw SpannerExceptionFactory.propagateInterrupt(e); } } static void printUsageAndExit() { System.out.println("Leaderboard 1.0.0"); System.out.println("Usage:"); System.out.println(" java -jar leaderboard.jar " + "<command> <instance_id> <database_id> [command_option]"); System.out.println(""); System.out.println("Examples:"); System.out.println(" java -jar leaderboard.jar create my-instance example-db"); System.out.println(" - Create a sample Cloud Spanner database along with " + "sample tables in your project.\n"); System.exit(1); } public static void main(String[] args) throws Exception { if (!(args.length == 3 || args.length == 4)) { printUsageAndExit(); } SpannerOptions options = SpannerOptions.newBuilder().build(); Spanner spanner = options.getService(); try { String command = args[0]; DatabaseId db = DatabaseId.of(options.getProjectId(), args[1], args[2]); DatabaseClient dbClient = spanner.getDatabaseClient(db); DatabaseAdminClient dbAdminClient = spanner.getDatabaseAdminClient(); switch (command) { case "create": create(dbAdminClient, db); break; default: printUsageAndExit(); } } finally { spanner.close(); } System.out.println("Closed client"); } } 在 Cloud Shell Editor 的“文件”菜单下选择“保存”,保存您对 App.java 文件所做的更改。
您可以使用 java-docs-samples/spanner/leaderboard/step4/src 目录中的 App.java 文件查看添加代码以启用 create 命令后 App.java 文件外观的示例。
如需构建应用,请从 pom.xml 所在的目录运行 mvn 软件包:
mvn package 成功构建 Java jar 文件后,输入以下命令在 Cloud Shell 中运行生成的应用:
java -jar target/leaderboard.jar 您应该会看到如下所示的输出:
Leaderboard 1.0.0 Usage: java -jar leaderboard.jar <command> <instance_id> <database_id> [command_option] Examples: java -jar leaderboard.jar create my-instance example-db - Create a sample Cloud Spanner database along with sample tables in your project.
从此响应中我们可以看到,Leaderboard 应用当前有一个可能的命令:create。我们可以看到 create 命令的预期参数是实例 ID 和数据库 ID。
现在运行以下命令。
java -jar target/leaderboard.jar create cloudspanner-leaderboard leaderboard 几秒钟后,您应该看到如下的响应:
Created database [projects/your-project/instances/cloudspanner-leaderboard/databases/leaderboard]
在 Cloud Console 的 Cloud Spanner 部分中,您应该在左侧菜单中看到新的数据库和表。

在下一步中,我们将更新应用以将一些数据加载到新数据库中。
现在,我们有一个名为 leaderboard 的数据库,包含两个表:Players 和 Scores。现在,我们使用 Java 客户端库在 Players 表中填充玩家人数,在 Scores 表中填入每个玩家的随机得分。
如果 Cloud Shell Editor 尚未打开,请点击下面突出显示的图标来打开它:

接下来,修改App.java向 Cloud Shell 编辑器中添加一个insert命令,用于将 100 名玩家插入Players您可以使用 表格插入 4 个随机得分,Scores表格中的每个播放器Players表。
首先更新应用文件顶部的 imports 部分,替换当前的部分,以便一旦完成,它应如下所示:
package com.google.codelabs; import static com.google.cloud.spanner.TransactionRunner.TransactionCallable; import com.google.api.gax.longrunning.OperationFuture; import com.google.cloud.spanner.Database; import com.google.cloud.spanner.DatabaseAdminClient; import com.google.cloud.spanner.DatabaseClient; import com.google.cloud.spanner.DatabaseId; import com.google.cloud.spanner.Mutation; import com.google.cloud.spanner.ResultSet; import com.google.cloud.spanner.Spanner; import com.google.cloud.spanner.SpannerException; import com.google.cloud.spanner.SpannerExceptionFactory; import com.google.cloud.spanner.SpannerOptions; import com.google.cloud.spanner.Statement; import com.google.cloud.spanner.TransactionContext; import com.google.spanner.admin.database.v1.CreateDatabaseMetadata; import java.time.Instant; import java.time.LocalDate; import java.time.LocalDateTime; import java.time.LocalTime; import java.time.ZoneOffset; import java.util.ArrayList; import java.util.Arrays; import java.util.List; import java.util.Random; import java.util.concurrent.ExecutionException; import java.util.concurrent.ThreadLocalRandom; 接下来,在现有 create() 方法下方、现有 printUsageAndExit() 方法下方添加以下 insert、insertPlayers 和 insertScores 方法:
static void insert(DatabaseClient dbClient, String insertType) { try { insertType = insertType.toLowerCase(); } catch (Exception e) { // Invalid input received, set insertType to empty string. insertType = ""; } if (insertType.equals("players")) { // Insert players. insertPlayers(dbClient); } else if (insertType.equals("scores")) { // Insert scores. insertScores(dbClient); } else { // Invalid input. System.out.println("Invalid value for 'type of insert'. " + "Specify a valid value: 'players' or 'scores'."); System.exit(1); } } static void insertPlayers(DatabaseClient dbClient) { dbClient .readWriteTransaction() .run( new TransactionCallable<Void>() { @Override public Void run(TransactionContext transaction) throws Exception { // Get the number of players. String sql = "SELECT Count(PlayerId) as PlayerCount FROM Players"; ResultSet resultSet = transaction.executeQuery(Statement.of(sql)); long numberOfPlayers = 0; if (resultSet.next()) { numberOfPlayers = resultSet.getLong("PlayerCount"); } // Insert 100 player records into the Players table. List<Statement> stmts = new ArrayList<Statement>(); long randomId; for (int x = 1; x <= 100; x++) { numberOfPlayers++; randomId = (long) Math.floor(Math.random() * 9_000_000_000L) + 1_000_000_000L; Statement statement = Statement .newBuilder( "INSERT INTO Players (PlayerId, PlayerName) " + "VALUES (@PlayerId, @PlayerName) ") .bind("PlayerId") .to(randomId) .bind("PlayerName") .to("Player " + numberOfPlayers) .build(); stmts.add(statement); } transaction.batchUpdate(stmts); return null; } }); System.out.println("Done inserting player records..."); } static void insertScores(DatabaseClient dbClient) { boolean playerRecordsFound = false; ResultSet resultSet = dbClient .singleUse() .executeQuery(Statement.of("SELECT * FROM Players")); while (resultSet.next()) { playerRecordsFound = true; final long playerId = resultSet.getLong("PlayerId"); dbClient .readWriteTransaction() .run( new TransactionCallable<Void>() { @Override public Void run(TransactionContext transaction) throws Exception { // Initialize objects for random Score and random Timestamp. LocalDate endDate = LocalDate.now(); long end = endDate.toEpochDay(); int startYear = endDate.getYear() - 2; int startMonth = endDate.getMonthValue(); int startDay = endDate.getDayOfMonth(); LocalDate startDate = LocalDate.of(startYear, startMonth, startDay); long start = startDate.toEpochDay(); Random r = new Random(); List<Statement> stmts = new ArrayList<Statement>(); // Insert 4 score records into the Scores table // for each player in the Players table. for (int x = 1; x <= 4; x++) { // Generate random score between 1,000,000 and 1,000 long randomScore = r.nextInt(1000000 - 1000) + 1000; // Get random day within the past two years. long randomDay = ThreadLocalRandom.current().nextLong(start, end); LocalDate randomDayDate = LocalDate.ofEpochDay(randomDay); LocalTime randomTime = LocalTime.of( r.nextInt(23), r.nextInt(59), r.nextInt(59), r.nextInt(9999)); LocalDateTime randomDate = LocalDateTime.of(randomDayDate, randomTime); Instant randomInstant = randomDate.toInstant(ZoneOffset.UTC); Statement statement = Statement .newBuilder( "INSERT INTO Scores (PlayerId, Score, Timestamp) " + "VALUES (@PlayerId, @Score, @Timestamp) ") .bind("PlayerId") .to(playerId) .bind("Score") .to(randomScore) .bind("Timestamp") .to(randomInstant.toString()) .build(); stmts.add(statement); } transaction.batchUpdate(stmts); return null; } }); } if (!playerRecordsFound) { System.out.println("Parameter 'scores' is invalid since " + "no player records currently exist. First insert players " + "then insert scores."); System.exit(1); } else { System.out.println("Done inserting score records..."); } } 然后,为了使 insert 命令正常运行,请在 switch (command) 语句中将以下代码添加到应用的“main”方法:
case "insert": String insertType; try { insertType = args[3]; } catch (ArrayIndexOutOfBoundsException exception) { insertType = ""; } insert(dbClient, insertType); break; 完成之后,switch (command) 语句应如下所示:
switch (command) { case "create": create(dbAdminClient, db); break; case "insert": String insertType; try { insertType = args[3]; } catch (ArrayIndexOutOfBoundsException exception) { insertType = ""; } insert(dbClient, insertType); break; default: printUsageAndExit(); } 要为您的应用添加“插入”功能,最后一步是向 printUsageAndExit() 方法添加“insert”命令的帮助文本。将以下代码行添加到 printUsageAndExit() 方法中,以纳入插入命令的帮助文本:
System.out.println(" java -jar leaderboard.jar insert my-instance example-db players"); System.out.println(" - Insert 100 sample Player records into the database.\n"); System.out.println(" java -jar leaderboard.jar insert my-instance example-db scores"); System.out.println(" - Insert sample score data into Scores sample Cloud Spanner " + "database table.\n"); 在 Cloud Shell Editor 的“文件”菜单下选择“保存”,保存您对 App.java 文件所做的更改。
您可以使用 java-docs-samples/spanner/leaderboard/step5/src 目录中的 App.java 文件查看添加代码以启用 insert 命令后 App.java 文件外观的示例。
现在,我们来重新编译并运行应用,以确认新的 insert 命令是否包含在应用的可能命令列表中。
要构建应用,请从 pom.xml 所在的目录运行 mvn package:
mvn package 成功构建 Java jar 文件后,请运行以下命令:
java -jar target/leaderboard.jar 您应该会看到应用的默认输出中现在包含 insert 命令:
Leaderboard 1.0.0 Usage: java -jar leaderboard.jar <command> <instance_id> <database_id> [command_option] Examples: java -jar leaderboard.jar create my-instance example-db - Create a sample Cloud Spanner database along with sample tables in your project. java -jar leaderboard.jar insert my-instance example-db players - Insert 100 sample Player records into the database. java -jar leaderboard.jar insert my-instance example-db scores - Insert sample score data into Scores sample Cloud Spanner database table.
您可以从响应中看到,除了实例 ID 和数据库 ID 以外,还有一个参数可以具有“players”或“scores”值。
现在,我们使用在调用 create 命令时使用的参数值时运行 insert 命令,添加“players”作为附加“插入类型”参数。
java -jar target/leaderboard.jar insert cloudspanner-leaderboard leaderboard players 几秒钟后,您应该看到如下的响应:
Done inserting player records...
现在,让我们使用 Java 客户端库在 Scores 表中填充四个随机得分以及 Players 表中每个玩家的时间戳。
通过以下 SQL 语句,将 Scores 表的 Timestamp 列定义为“提交时间戳”列,该 SQL 语句是在我们先前运行 create 命令时执行的:
CREATE TABLE Scores( PlayerId INT64 NOT NULL, Score INT64 NOT NULL, Timestamp TIMESTAMP NOT NULL OPTIONS(allow_commit_timestamp=true) ) PRIMARY KEY(PlayerId, Timestamp), INTERLEAVE IN PARENT Players ON DELETE NO ACTION 请注意 OPTIONS(allow_commit_timestamp=true) 特性。这使得 Timestamp 成为“提交时间戳”列,并且会在指定表行中自动填充 INSERT 和 UPDATE 操作的确切事务时间戳。
您还可以将自己的时间戳值插入“提交时间戳”列中,只要您插入带有过去值的时间戳即可,这是本 Codelab 将要做的。
现在,我们运行 insert 命令,与我们在调用 create 命令将“score”添加为附加的“插入类型”参数。
java -jar target/leaderboard.jar insert cloudspanner-leaderboard leaderboard scores 几秒钟后,您应该看到如下的响应:
Done inserting score records...
使用指定为 scores 的“插入类型”运行 insert 会调用 insertScores 方法,它使用以下代码段插入一个随机生成的时间戳,其中包含一个过去发生日期的日期:
LocalDate endDate = LocalDate.now(); long end = endDate.toEpochDay(); int startYear = endDate.getYear() - 2; int startMonth = endDate.getMonthValue(); int startDay = endDate.getDayOfMonth(); LocalDate startDate = LocalDate.of(startYear, startMonth, startDay); long start = startDate.toEpochDay(); ... long randomDay = ThreadLocalRandom.current().nextLong(start, end); LocalDate randomDayDate = LocalDate.ofEpochDay(randomDay); LocalTime randomTime = LocalTime.of( r.nextInt(23), r.nextInt(59), r.nextInt(59), r.nextInt(9999)); LocalDateTime randomDate = LocalDateTime.of(randomDayDate, randomTime); Instant randomInstant = randomDate.toInstant(ZoneOffset.UTC); ... .bind("Timestamp") .to(randomInstant.toString()) 如需使用“插入”事务发生时的确切时间戳自动填充 Timestamp 列,您可以改为插入 Java 常量 Value.COMMIT_TIMESTAMP,如以下代码段所示:
.bind("Timestamp") .to(Value.COMMIT_TIMESTAMP) 现在我们已完成数据加载,接下来我们将验证刚刚写入到新表的值。首先选择 leaderboard 数据库,然后选择 Players 表。点击 Data 标签页。您应该看到表的 PlayerId 和 PlayerName 列中有数据。

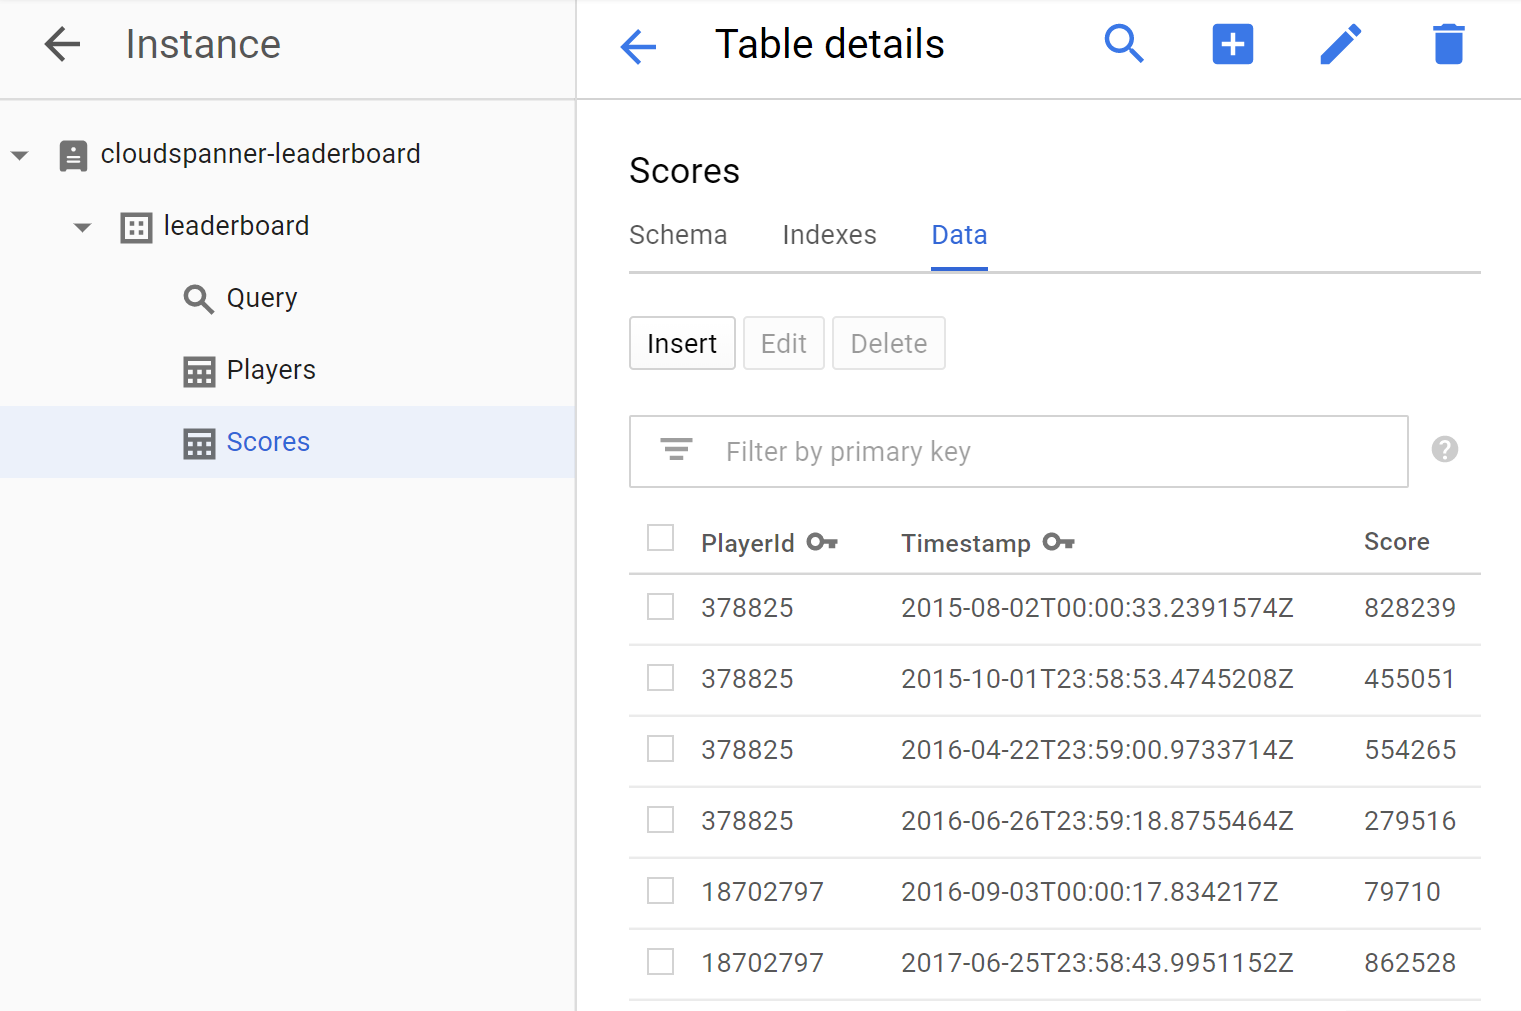
接下来,通过点击 Scores 表并选择 Data 标签页,验证“得分”表中是否也包含数据。您应该看到表的 PlayerId、Timestamp 和 Score 列中都有数据。
太棒了! 让我们更新我们的应用,以运行一些可用于创建游戏排行榜的查询。
现在我们已经建立了数据库并将信息加载到表中,让我们使用此数据创建一个排行榜。为此,我们需要回答以下四个问题:
- 哪些玩家属于“十大热门”游戏?
- 今年哪些国家/地区的“十大”玩家?
- 当月哪些玩家为“十大”?
- 本周哪些玩家达到“十大”?
我们来更新我们的应用以运行能够解答这些问题的 SQL 查询。
我们将添加一个 query 命令,通过该命令运行查询,回答可生成排行榜上所需信息的问题。
在 Cloud Shell Editor 中修改 App.java 文件,以更新应用以添加 query 命令。query 命令由两个 query 方法组成,一个只需接受 DatabaseClient 参数,另一个采用额外 timespan 参数,以便按指定时间指定的时间范围对结果进行过滤。
在现有的 insertScores() 方法之下和现有的 printUsageAndExit() 方法之上添加以下两个 query 方法:
static void query(DatabaseClient dbClient) { String scoreDate; String score; ResultSet resultSet = dbClient .singleUse() .executeQuery( Statement.of( "SELECT p.PlayerId, p.PlayerName, s.Score, s.Timestamp " + "FROM Players p " + "JOIN Scores s ON p.PlayerId = s.PlayerId " + "ORDER BY s.Score DESC LIMIT 10")); while (resultSet.next()) { scoreDate = String.valueOf(resultSet.getTimestamp("Timestamp")); score = String.format("%,d", resultSet.getLong("Score")); System.out.printf( "PlayerId: %d PlayerName: %s Score: %s Timestamp: %s\n", resultSet.getLong("PlayerId"), resultSet.getString("PlayerName"), score, scoreDate.substring(0,10)); } } static void query(DatabaseClient dbClient, int timespan) { String scoreDate; String score; Statement statement = Statement .newBuilder( "SELECT p.PlayerId, p.PlayerName, s.Score, s.Timestamp " + "FROM Players p " + "JOIN Scores s ON p.PlayerId = s.PlayerId " + "WHERE s.Timestamp > " + "TIMESTAMP_SUB(CURRENT_TIMESTAMP(), " + " INTERVAL @Timespan HOUR) " + "ORDER BY s.Score DESC LIMIT 10") .bind("Timespan") .to(timespan) .build(); ResultSet resultSet = dbClient .singleUse() .executeQuery(statement); while (resultSet.next()) { scoreDate = String.valueOf(resultSet.getTimestamp("Timestamp")); score = String.format("%,d", resultSet.getLong("Score")); System.out.printf( "PlayerId: %d PlayerName: %s Score: %s Timestamp: %s\n", resultSet.getLong("PlayerId"), resultSet.getString("PlayerName"), score, scoreDate.substring(0,10)); } } 然后,使 query 命令正常运行,请将以下代码添加到应用的“main”方法中的 switch(command) 语句:
case "query": if (args.length == 4) { int timespan = 0; try { timespan = Integer.parseInt(args[3]); } catch (NumberFormatException e) { System.err.println("query command's 'timespan' parameter must be a valid integer."); System.exit(1); } query(dbClient, timespan); } else { query(dbClient); } break; 向您的应用添加“查询”功能的最后一步是向 printUsageAndExit() 方法添加“query”命令的帮助文本。将以下代码行添加到 printUsageAndExit() 方法中,以添加“query”命令的帮助文本:
System.out.println(" java -jar leaderboard.jar query my-instance example-db"); System.out.println(" - Query players with top ten scores of all time.\n"); System.out.println(" java -jar leaderboard.jar query my-instance example-db 168"); System.out.println(" - Query players with top ten scores within a timespan " + "specified in hours.\n"); 在 Cloud Shell Editor 的“文件”菜单下选择“保存”,保存您对 App.java 文件所做的更改。
您可以使用 dotnet-docs-samples/applications/leaderboard/step6/src 目录中的 App.java 文件查看添加代码以启用 query 命令后 App.java 文件外观的示例。
要构建应用,请从 pom.xml 所在的目录运行 mvn package:
mvn package 现在,我们来运行该应用,以确认新的 query 命令是否包含在应用的可能命令列表中。运行以下命令:
java -jar target/leaderboard.jar 您现在会在应用的默认输出中看到 query 命令作为新的命令选项:
Leaderboard 1.0.0 Usage: java -jar leaderboard.jar <command> <instance_id> <database_id> [command_option] Examples: java -jar leaderboard.jar create my-instance example-db - Create a sample Cloud Spanner database along with sample tables in your project. java -jar leaderboard.jar insert my-instance example-db players - Insert 100 sample Player records into the database. java -jar leaderboard.jar insert my-instance example-db scores - Insert sample score data into Scores sample Cloud Spanner database table. java -jar leaderboard.jar query my-instance example-db - Query players with top ten scores of all time. java -jar leaderboard.jar query my-instance example-db 168 - Query players with top ten scores within a timespan specified in hours.
您可以看出,除了实例 ID 和数据库 ID 参数外,query 命令还允许我们指定了一个可选的时间范围,该时间段用于根据 Scores 表的Timestamp 列进行分区。由于 timespan 参数是可选的,因此如果未包含 timespan 参数,则不会按时间戳过滤记录。因此,我们可以使用不含“timespan”值的 query 命令,来获得始终如一的“十大”球员的列表。
我们使用与运行 create 命令时所用的参数值,运行 query 命令,而无需指定“timespan”。
java -jar target/leaderboard.jar query cloudspanner-leaderboard leaderboard 您应会看到包含所有“十大”玩家的响应,如下所示:
PlayerId: 4018687297 PlayerName: Player 83 Score: 999,618 Timestamp: 2017-07-01 PlayerId: 4018687297 PlayerName: Player 83 Score: 998,956 Timestamp: 2017-09-02 PlayerId: 4285713246 PlayerName: Player 51 Score: 998,648 Timestamp: 2017-12-01 PlayerId: 5267931774 PlayerName: Player 49 Score: 997,733 Timestamp: 2017-11-09 PlayerId: 1981654448 PlayerName: Player 35 Score: 997,480 Timestamp: 2018-12-06 PlayerId: 4953940705 PlayerName: Player 87 Score: 995,184 Timestamp: 2018-09-14 PlayerId: 2456736905 PlayerName: Player 84 Score: 992,881 Timestamp: 2017-04-14 PlayerId: 8234617611 PlayerName: Player 19 Score: 992,399 Timestamp: 2017-12-27 PlayerId: 1788051688 PlayerName: Player 76 Score: 992,265 Timestamp: 2018-11-22 PlayerId: 7127686505 PlayerName: Player 97 Score: 992,038 Timestamp: 2017-12-02 现在,让我们运行带有必要参数的 query 命令,通过指定等于一年中小时数的“时间范围”(即 8760)来查询年度“十大”玩家。
java -jar target/leaderboard.jar query cloudspanner-leaderboard leaderboard 8760 您应该会看到一条包含一年中排名前 10 位的玩家的响应,如下所示:
PlayerId: 1981654448 PlayerName: Player 35 Score: 997,480 Timestamp: 2018-12-06 PlayerId: 4953940705 PlayerName: Player 87 Score: 995,184 Timestamp: 2018-09-14 PlayerId: 1788051688 PlayerName: Player 76 Score: 992,265 Timestamp: 2018-11-22 PlayerId: 6862349579 PlayerName: Player 30 Score: 990,877 Timestamp: 2018-09-14 PlayerId: 5529627211 PlayerName: Player 16 Score: 989,142 Timestamp: 2018-03-30 PlayerId: 9743904155 PlayerName: Player 1 Score: 988,765 Timestamp: 2018-05-30 PlayerId: 6809119884 PlayerName: Player 7 Score: 986,673 Timestamp: 2018-05-16 PlayerId: 2132710638 PlayerName: Player 54 Score: 983,108 Timestamp: 2018-09-11 PlayerId: 2320093590 PlayerName: Player 79 Score: 981,373 Timestamp: 2018-05-07 PlayerId: 9554181430 PlayerName: Player 80 Score: 981,087 Timestamp: 2018-06-21 现在,我们运行 query 命令来查询每月的“十大”玩家,方法是指定“时间范围”等于一个月中的小时(共 730 个)。
java -jar target/leaderboard.jar query cloudspanner-leaderboard leaderboard 730 您应该会看到一条包含当月“前十大玩家”的响应,如下所示:
PlayerId: 3869829195 PlayerName: Player 69 Score: 949,686 Timestamp: 2019-02-19 PlayerId: 7448359883 PlayerName: Player 20 Score: 938,998 Timestamp: 2019-02-07 PlayerId: 1981654448 PlayerName: Player 35 Score: 929,003 Timestamp: 2019-02-22 PlayerId: 9336678658 PlayerName: Player 44 Score: 914,106 Timestamp: 2019-01-27 PlayerId: 6968576389 PlayerName: Player 40 Score: 898,041 Timestamp: 2019-02-21 PlayerId: 5529627211 PlayerName: Player 16 Score: 896,433 Timestamp: 2019-01-29 PlayerId: 9395039625 PlayerName: Player 59 Score: 879,495 Timestamp: 2019-02-09 PlayerId: 2094604854 PlayerName: Player 39 Score: 860,434 Timestamp: 2019-02-01 PlayerId: 9395039625 PlayerName: Player 59 Score: 849,955 Timestamp: 2019-02-21 PlayerId: 4285713246 PlayerName: Player 51 Score: 805,654 Timestamp: 2019-02-02 现在,我们运行 query 命令来查询每周的“十大”玩家,方法是指定“时间范围”等于一周中的小时(共 168 个)。
java -jar target/leaderboard.jar query cloudspanner-leaderboard leaderboard 168 您应该会看到一条包含本周排名“十大”玩家的响应,如下所示:
PlayerId: 3869829195 PlayerName: Player 69 Score: 949,686 Timestamp: 2019-02-19 PlayerId: 1981654448 PlayerName: Player 35 Score: 929,003 Timestamp: 2019-02-22 PlayerId: 6968576389 PlayerName: Player 40 Score: 898,041 Timestamp: 2019-02-21 PlayerId: 9395039625 PlayerName: Player 59 Score: 849,955 Timestamp: 2019-02-21 PlayerId: 5954045812 PlayerName: Player 8 Score: 795,639 Timestamp: 2019-02-22 PlayerId: 3889939638 PlayerName: Player 71 Score: 775,252 Timestamp: 2019-02-21 PlayerId: 5529627211 PlayerName: Player 16 Score: 604,695 Timestamp: 2019-02-19 PlayerId: 9006728426 PlayerName: Player 3 Score: 457,208 Timestamp: 2019-02-22 PlayerId: 8289497066 PlayerName: Player 58 Score: 227,697 Timestamp: 2019-02-20 PlayerId: 8065482904 PlayerName: Player 99 Score: 198,429 Timestamp: 2019-02-24 进展喜人!
随着您添加记录,Cloud Spanner 会根据您的数据库扩大规模需求。无论您数据库的增长幅度如何,使用 Cloud Spanner 及其 Truetime 技术,游戏排行榜都可以继续保持精准扩容。
在使用 Spanner 完成各种有趣的任务之后,我们需要清理游乐场,从而节省宝贵的资源和金钱。幸运的是,这是一个简单的步骤,您只需转到 Cloud Console 的 Cloud Spanner 部分,然后在 Codelab 步骤中删除名为“设置 Cloud Spanner 实例”的实例。
我们的学习内容:
- 排行榜的 Google Cloud Spanner 实例、数据库和表架构
- 如何创建 Java 控制台应用
- 如何使用 Java 客户端库创建 Spanner 数据库和表
- 如何使用 Java 客户端库将数据加载到 Spanner 数据库中
- 如何使用 Spanner 提交时间戳和 Java 客户端库从数据中查询“十大”结果
后续步骤:
- 阅读 Spanner CAP 白皮书
- 了解架构设计和查询最佳做法
- 详细了解 Cloud Spanner 提交时间戳
向我们提供反馈
- 请抽出一些时间填写这份简短的调查问卷